Wednesday, May 30, 2012

Lacy Shawl


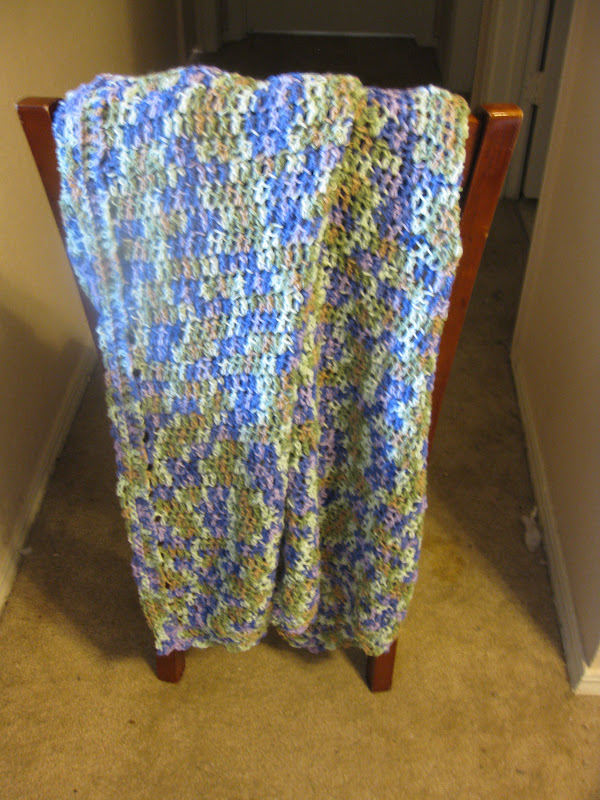
In the Cozy Shawl pattern, there was a solid inner section with a wide lacy edging.  With the coming of spring, the shawl became a little warm to wear, so I designed an all lace shawl.  It is actually a simple pattern, especially if you've used the Cozy Shawl pattern.  The shawl is entirely composed of the lace edging.


In any case, here's the pattern:

Chain 2
Row 1: 3 sc in 2nd chain from the hook (3 sc)
Row 2: ch 1, turn, 2 sc in first sc, sc 2 sc in last sc (5 sc)

Edging:
Row 1: ch 1, do not turn, 2 sc in corner, sc, 3 sc in point, sc, 2 sc in corner
Row 2: ch 3, turn, 2 dc in corner, ch 3, sk 3, (dc, ch 3, dc) in point, ch 3, sk 3, 3 dc in corner
Row 3: ch 3, turn, 2 dc in corner, dc in next 2 dc, ch 3, dc in dc, (ch 3, dc, ch 3) in point, dc in dc, ch 3, dc in next 2 dc, 3 dc in corner
Row 4: ch 3, turn, 2 dc in corner, ch 3, sk 3, dc, ch 3, dc in dc, ch 3, (dc, ch 3, dc) in point, ch 3, dc in dc, ch 3, dc, ch 3, sk 3, 3 dc in corner
Row 5: ch 3, turn, 2 dc in corner, dc in next 2 dc, ch 3, (dc in dc, ch 3) to point, (ch 3, dc, ch 3) in point, ch 3, (dc in dc, ch 3) to last 3 dc, dc in next 2 dc, 3 dc in corner
Row 6: ch 3, turn, 2 dc in corner, sk 3, (ch 3, dc in dc) to point, (dc, ch 3, dc) in point, dc in dc, (ch 3, dc in dc) to corner, 3 dc in corner

Rows 7-26: repeat rows 5-6 10 times

Row 27: ch 3, turn, 2 dc in corner, dc, 4 dc in next dc, sc in dc, (7 dc in dc, sc in dc) to point, 7 dc in point,  sc in dc, (7 dc in dc, sc in dc) to last 3 dc, 4 dc in next dc, dc, 3 dc in corner

Finishing: ch 1, turn, sc across the top, slip stitch, fasten off, weave in ends.

Essentially, you dc in each of the posts across with either a (dc, ch 3, dc) or a (ch 3, dc, ch 3) in the point.  You will always have 3 dc in the corners (ch 3 counts as a dc).

I made this with Baby Bee Sweet Delights Sidewalk yarn with a J hook.

Monday, May 28, 2012

Celtic Star Blanket

So, when I originally worked out how to graphically work out the color patterns, I came up with the Featured Color pattern.  I decided to try it out in a full sized afghan with some yarn I wanted to clear out of my stash.  The colors in this blanket look Irish to me, probably because the featured color is Kelly Green, and since the accent row is made up of star stitches, I have dubbed this the Celtic Star Blanket.

So, I knew the yarn, the color pattern, featured color, but had to decide what stitch to use.  I finally decided to keep it fairly simple, and do mostly dc, with accent rows of Star Stitches.  My friend introduced me to this stitch and wrote up a picture tutorial on how to do this star stitch.  I have since labeled this the star lattice stitch pattern.  The star stitch uses more yarn per row than does dc, so you will need more yarn of that color than the other colors.

I really like the thin stripes this color pattern gives.  The star stitch as an accent row gives the blanket at least the look of some texture.  

Here's the color pattern:  (2 rows of gray, 1 row of green, 2 rows of white, 1 row of green) repeated, ending with 2 rows of gray.

Chain 149
Row 1: dc in 4th chain from hook, dc across (gray)
Row 2: ch 3, turn, dc across (gray)
Row 3: ch 3, turn, work star stitch across (green)
Rows 4-5: ch 3, turn dc across (white)
Row 6: ch 3, turn, work star stitch across (green)
Row 7: ch 3, turn dc across (gray)
Repeat Rows 2-7, (ending with row 2) until work reaches desired length.

Border:
Round 1: star stitch around, 5 dc and legs of 2 star stitches in each corner (do a star stitch in each row on the sides)
Round 2: dc around, 5 dc in each corner
Round 3: dc around, 5 dc in each corner
Round 4: star stitch around, 5 dc and legs of 2 star stitches in each corner
Round 5: dc around, 5 dc in each corner
Round 6: dc around, 5 dc in each corner
Round 7: star stitch around, 5 dc and legs of 2 star stitches in each corner
Round 8: dc around, 5 dc in each corner
Round 9: dc around, 5 dc in each corner
Round 10: star stitch around, 5 dc and legs of 2 star stitches in each corner


I made this using Loops and Threads Impeccable yarn in Kelly Green, White, and Clay (gray) with a J hook.

Friday, May 25, 2012

Zipper Blanket

So, another of my buddies is getting married this summer.  I am therefore gifting the couple with one of my crocheted afghans.  This blanket essentially consists of panels of three alternating colors separated by a row of front and back post dc.  This row looks like a zipper to me, so I've thought of this blanket as my Zipper Blanket.  This blanket does not use any of the color patterns that prevent yarn cutting, so there are lots of strings on this blanket.  I would not make another one of these for that very reason. 

Here's how I made this:
Chain 209

Row 1: dc in 4th ch from hook, dc across (yellow)
Row 2-6: ch 3, turn, dc across (yellow)
Row 7: ch 2, turn, (fpdc, bpdc) across, hdc in last stitch (purple)
Row 8: ch 2, turn, (fpdc, bpdc) across, hdc in last stitch (brown)
Repeat rows 2-8 for the pattern, ending with a block of yellow, changing colors in this order (yellow, purple, brown)

Border:
Round 1: (fpdc, bpdc) around, 3 hdc in corner (purple)

I made this blanket with I Love this Yarn in Hot Yellow, Coffee, and Mixed Berry, with a J hook.

Tuesday, May 22, 2012

Star Lattice Baby Blanket

So, my last post showed you the star lattice stitch pattern.  It's a simple stitch with a little twist.  In variegated yarn it messes up the self striping patterns that tend to develop.  That makes it so that you can actually see the pattern.  Here's a baby blanket I made from it.

Here's how to make it:
Chain 91:
Row 1: dc in 4th chain from hook, dc across
Row 2: ch 3, turn, dc across
Row 3: ch 3, turn, star stitch across
Rows 4-5: ch 3, turn, dc across

Repeat rows 3-5 until work is square.  Add the standard border and you're done:
Round 1: sc around, 3 sc in each corner
Round 2: dc around, 5 dc in each corner
Round 3: sc around, 3 sc in each corner
Round 4: (sc, ch 3, sk 1) around, (sc, ch 3, sc) in corner

I made this with Baby Bee 'Sugar Plum Camo' yarn with a J hook.

Monday, May 21, 2012

Star Lattice Stitch

So today I'm going to talk to you about a stitch pattern I have used several times.  It's really rather simple, but I like the overall effect.  The pattern consists of three rows repeated: a row of star stitches followed by two rows of double crochet stitches.  The row of star stitches is denser and slightly thicker than the rows of dc.  I think of the two rows of dc as the lattice, hence the star lattice stitch pattern.

My friend Nettie taught me the star stitch and has a picture tutorial about it here.  Here's a brief explanation of the star stitch, but you should really check out Nettie's tutorial for help.


Decrease: YO, insert hook in same st as last stitch, YO, pull up a loop, YO, draw through 2 loops on hook, skip next stitch, YO, pull up a loop, YO, draw through 2 loops on hook, YO, draw through all 3 loops on hook.

Anyway, to do the star stitch, you chain 3 (counts as first dc), turn, then work a decrease stitch.  Work a dc in the same stitch as the last leg of the previous decrease stitch.  Then work decrease in the same stitch as the previous dc.  Repeat (dc, decrease) across.  At end of row, dc in last stitch.

Half of the stitches will have three stitches in them, and the other half will have none.  In a normal decrease stitch pattern, you would decrease, ch 1, decrease, ch 1 across.  The star stitch simply has a dc in place of the ch 1 space. 

I once made a scarf entirely out of the star stitch, but became a little frustrated with the number of times I had to pull out rows to fix a mistake.  The scarf turned out beautifully, but my feeling of frustration remained.  Having two rows of dc between each row of star stitches makes it more forgiving.  It is much easier to 'fudge' something at the end of the row this way.

This stitch pattern lends itself to two striping patterns because it has three rows in it.  Thick and Thin and Featured Color stripes work well.

To make something with this pattern:
Chain an odd number
Row 1: dc in 4th chain from hook, dc across
Row 2: ch 3, turn, dc across
Row 3: ch 3, turn, star stitch across
Rows 4-5: ch 3, turn, dc across

Repeat rows 3-5 until work reaches desired length.

Friday, May 18, 2012

And again with the Stitch 28!

Well, I'm continuing to make baby blankets and I really like stitch 28 for making them, especially with variegated yarn.  This stitch is great for baby blankets because it is so simple, fast, and easy.  It also is mostly solid but not overly so.  There are some gaps, giving it a touch of delicacy.  This stitch is lacy strength.  I obviously really like this stitch or I would not have made three baby blankets from it.

I made it exactly like the previous two baby blankets (original and revisited) from this stitch.

Once again, here's the pattern:
Round 1: sc around, 3 sc in each corner
Round 2: dc around, 5 dc in each corner
Round 3: sc around, 3 sc in each corner
Round 4: (sc, ch 3, sk 1) around, (sc, ch 3, sc in same stitch) at corner

I made this using Bernat Baby Coordinates, Candy Baby with a J hook.

Wednesday, May 16, 2012

Craziness and Awards

So it has been an absolutely insane week.  We had Mother's Day, Prom, my mom's birthday, my graduation, my friend's wedding, and a work retreat this week.  Hence the lack of posting, but things should be getting back to normal now, or as normal as it ever is.  In any case, all the craziness was caused by an overabundance of good things happening at once, so I have no complaints.  I'm just happy that tonight I get a chance to just relax and take a deep breath, maybe watch a movie at home.


When I returned from all of the madness, it was to find that my blog had gotten a Liebster Award for new bloggers.  Thanks to Angie of The Enchanted Ladybug
 for the award.  The purpose of the award is to give good new blogs more exposure.

Rules for receiving your award:

1. Post about your win on your blog.
2. Link back to the blogger who presented you with the award.
3. Copy and past the award button to your blog.
4. Present the Liebster Award to 5 blogs that have fewer than 200 followers that you think deserve to be recognized.
5. Let them know by leaving a comment on their blog.


And the five newest recipients of the Liebster Award are:
1) There's Love in the Stitches: A great source for crochet stitch tutorials
2) Mama Netties Crochet: Crochet patterns using stitches from Love in the Stitches
3) The Curious Country Cook: Inventive ways to make yummy foods
4) Capricious Butterfly: Sewing and knitting craftiness
5) Champagne Maker: Humorous knitting

Friday, May 11, 2012

Stitch 2 Revisited

In an effort to use up my stash of variegated baby yarn, I am going back through the book and picking out stitches that lend themselves to variegation and making more baby blankets.  Stitch 2 is pretty and dramatic with variegated yarn because there is such a change in amount of yarn used per unit length.  There are sc, dc, and stretches of chains.  This means that the colors do not end up in rigid patterns.  There is a riot of color in this blanket.  I used the same yarn for this blanket as I did for the Rainbow Shell baby blanket.  Basically, if you are going to use variegated yarn, embrace the color changes, use it to your advantage.  I think this came out beautifully.


This baby blanket differs from the stitch 2 baby blanket in the yarn that I used and the border. 


Here's the pattern:
Ch 90, then work the stitch until the blanket is square.  Add the standard border and you're done.
Round 1: sc around, 3 sc in each corner
Round 2: dc around, 5 dc in each corner
Round 3: sc around, 3 sc in each corner
Round 4: (sc, ch 3, sk 1) around, (sc, ch 3, sc in same stitch) at corner

I made this with Bernat Baby Coordinates Candy Baby yarn with a J hook.

Thursday, May 10, 2012

Bumpy Bath Mats

Crocheted bath mats are especially nice because they not only are washable, but they improve when washed.  Cotton shrinks when washed, so it tightens up and actually feels softer after the first washing.  The stitch used to make the Bumpy Dishcloths is great for bathmats because the bumpiness feels good on your feet. I like variegated yarn for bathmats because it makes interesting patterns and the border looks neat.

These make great gifts.  I've given a set of them to both of my brothers as Christmas gifts when they resided in dorms.  Guys, especially dorm dwellers, are difficult to shop for, let alone make something for, but these work well in dorms.  With two, you can put one in front of the sink and one in front of the tub. 

Here's the pattern:
Ch 54
Row 1: sc in 2nd ch from hook, sc across, ch 1, turn
Row 2: sc, (tc, sc) x 13, ch 1, turn
Row 3: sc across, ch 1, turn
Row 4: sc, sc, (tc, sc) x 12, sc, ch 1 turn
Row 5: sc across, ch 1, turn
Repeat Rows 2-5 eight times, so that there are 18 rows of bumps. 

Border:
Round 1: sc around with 3 sc in each corner
Round 2: sc around with 3 sc in each corner
Slip stitch and fasten off.

This is the pattern for the bath mat I made for myself.  I made a larger size for my brothers by simply repeating the pattern more times.  Another modification that I have done is to make it with two strands at once.  It makes it thicker, so you don't need as long of a chain initially or do as many repeats.   Essentially, repeat the pattern until you are happy with the size. 

I made this using Sugar and Cream cotton yarn in Crown Jewel Ombre with a J hook.

Tuesday, May 8, 2012

Stitch 28 Revisited

Now that I'm done trying out the stitches from the Triple Play Pattern Stitches Book, I get to use them (or not) as I see fit.  So, I decided to make another baby blanket using stitch 28.  When I was making baby blankets from these stitches previously, the purpose was to showcase the stitch.  As such, it didn't make sense to use a dramatically variegated yarn, so I've been left with a lot of variegated baby yarn in my stash.  I made this blanket in an attempt to crochet down my stash.

I made it exactly the same as the stitch 28 baby blanket I made previously.  Here's the pattern:


Chain 91, then work the stitch until work is square.  Add the standard border and you're done.
Round 1: sc around, 3 sc in each corner
Round 2: dc around, 5 dc in each corner
Round 3: sc around, 3 sc in each corner
Round 4: (sc, ch 3, sk 1) around, (sc, ch 3, sc in same stitch) at corner

I made this using Baby Bee Sweet Delight Lullaby with a J hook.

Monday, May 7, 2012

Coupons!

Check out my 'Current Coupons' page.  On it you will find a page containing coupons for the week.  I plan to update them weekly, so they should stay current.  This way, you don't have to track down the coupons for yourself.  See my Coupon Guide for tips on using them as well as ways to obtain them yourself.

Friday, May 4, 2012

Foundation Stitch

My friend Nettie recently introduced me to what she calls the Abrupt Increase, AbInc, stitch.  Apparently, this stitch has an official name: the foundation stitch.  This is an advanced technique that can be used deliberately or to correct mistakes.  It essentially creates a new chain under each stitch, allowing you to work more free form.  Nettie explains the stitch, and shows a purse she made using the stitch along with the pattern. 

Have you ever made your chain and worked the first row of your project only to discover that you miscounted your chain?  Instead of pulling it all out and starting over you can simply do the foundation stitch to add another chain.  This is particularly useful because counting the chain and working the first row are the most tedious and attention requiring parts of crocheting. 

Another use for the foundation stitch is to abruptly increase the number of stitches per row.  That is the what Nettie did in making the clutch.  She used it to make the sides of the purse.

My favorite use for the stitch is its application to Tunisian crochet.  Before I learned this stitch, I would chain the length of the row, then I would chain the height of the row, and then finally I could begin.  The problem with that is that my chain is rarely perfectly even and consistent with the space my actual stitch takes up.  The old method is pictured.  Notice the chain on the left side of the work.  With the new method, you simply chain the height and work your stitch until you are content, the starter chain is unnecessary.  Less planning is needed and the side with the starting chain is not too loose or too tight because there is no starting chain.