Tuesday, February 28, 2012

Kicking off the second half: Stitch Sixteen!

The effect of this stitch is to create a checkerboard out of enlarged shells.  Stitch one also generates a checkerboard, but a much tighter one.  I personally prefer stitch one, but this one is also nice, creating a somewhat softer checkered effect.  A nice aspect of this stitch is that it is obvious where to do each component of the stitch.  It is also a fairly fast stitch because the height of each row is roughly equivalent to a double crochet stitch.

The color pattern I used was 2 rows of yellow, followed by (2 rows of pink, 2 rows of yellow) repeated.

Here's how to make it:
Chain 97, then work the stitch until blanket is square.  Add this border, and you're done.
Round 1: sc around, 3 sc in each corner (pink)
Round 2: dc around, 5 dc in each corner (pink)
Round 3: dc around, 5 dc in each corner (yellow)
Round 4: dc around, 5 dc in each corner (pink)
Round 5: sc around, 3 sc in each corner (pink)
Round 6: (sc, ch 3, sk 1) around, (sc, ch 3, sc in same stitch) at corner (pink)

I made this using Lion Brand Pound of Love Pastel Pink and Pastel Yellow with a J hook.

Saturday, February 25, 2012

Halfway there: Stitch Fifteen!

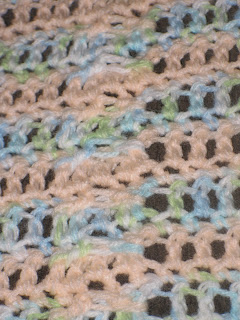
I was a little skeptical about this stitch before I began because it looks a little messy in the book.  In reality, it is a very simple stitch that manages to be both lacy and dense.  The holes are not very large, yet the fabric has a delicate to feel to it.  This blanket exceeded expectations both in the stitch and in the color pattern.  I embedded a variegated yarn in a solid color yarn.  I think the color pattern worked so well because the stitch is ideal for it.  I will probably use this stitch again, probably for another baby blanket.  Another advantage of this stitch is how quick it is; the fabric grows rapidly. 

The color pattern I used was 2 rows of brown, (1 row of variegated, 2 rows of brown) repeated, with a brown border.

Here's how to make it:
Chain 92 and work stitch until it's square.  Then add the standard border and you're done.
Round 1: sc around, 3 sc in each corner
Round 2: dc around, 5 dc in each corner
Round 3: sc around, 3 sc in each corner
Round 4: (sc, ch 3, sk 1) around, (sc, ch 3, sc in same stitch) at corner

I made this with Bernat Satin Sport Seashore and Taupe and a J hook.

Thursday, February 23, 2012

And then: Stitch Fourteen!

I have used this stitch previously and knew going into it that I wasn't going to like it very much.  The problem is that it is much too lacy.  It is almost exclusively made of doing stitches in spaces.  This translates into a very lacy fabric that is not very stable: the stitches slide around on the 'chain #' spaces.  One potential advantage to this is that it does make a slinky fabric.  That might work in a scarf, but I don't intend to use this stitch again.

The color pattern I used was 2 rows of orange, (2 rows of confetti, 2 rows of orange) repeated.

Here's how to make it:
Chain 94 then add the standard border:
Round 1: sc around, 3 sc in each corner (confetti)
Round 2: dc around, 5 dc in each corner (orange)
Round 3: sc around, 3 sc in each corner (confetti)
Round 4: (sc, ch 3, sk 1) around, (sc, ch 3, sc in same stitch) at corner (confetti)

I made this using Bernat Baby Peach Blossom (orange) and Pretty Girl (confetti) yarn with a  J hook.

Tuesday, February 21, 2012

Lacing it up: Stitch Thirteen!

I was skeptical about this stitch when I began, but I grew to like it.  The pictures in the book do not do this stitch justice because it is such a wide stitch pattern that you can't see the repeats in what is shown.  The overall effect is gorgeous with vertical stripes through the stitch with a shell portion and a trellis portion.  The stitch is lacy, and one I am likely to use in the future.  I am glad that I did this in a solid color because it allows the beauty of the stitch to come through.  Using variegated yarn or doing stripes in this stitch would overshadow the stitch, so I highly recommend solid colored yarn for this stitch.  One problem I encountered while working this stitch, is that if you don't pay attention to what you are doing, it is easy to do a shell where you are simply supposed to do one double crochet.  If you are actually looking at your work it is easy to tell where to do each portion, but if you only check it every few rows (like I was doing), you might end up having to pull out several rows.  This stitch would make a pretty scarf begun with a short chain.

Here's how to make it:
Chain 92 then work the stitch until it is square and add this border:
Round 1: sc around, 3 sc in each corner
Round 2: (dc, ch 1, sk 1) around, (dc, ch 1, dc, ch 1, dc) in each corner
Round 3: (dc, ch 1, sk 1) around, (dc, ch 1, dc, ch 1, dc) in each corner
Round 4: (dc, ch 1, sk 1) around, (dc, ch 1, dc, ch 1, dc) in each corner
Round 5: (5 dc, sc) around in each dc, 3 sc in each corner

I made this using Lion Brand Pound of Love Lavender yarn with a J hook.

Saturday, February 18, 2012

Keeping it coming: Stitch Twelve!


This stitch has an interesting look due to the boxes and zigzags that make it up.  I like the stitch but I would modify it slightly for future use.  One row of the pattern has split post stitches that I would change to being a split stitch that is not a post stitch.  In this blanket the post stitches are the first row of white in each repeat.  I don't think the post stitch adds anything to the stitch, though it does make it appear differently on each side, (shown below).  With the modification, this stitch would be good for scarves.

The color pattern I used is 2 rows of maroon, then (2 rows of white, 2 rows of maroon) repeated, ending with a single row of white.

Here's how to make it:
Chain 93, then work the stitch until it is square and add this border:
Round 1: sc around, 3 sc in each corner (white)
Round 2: (dc, ch 1, sk 1) around, (dc, ch 1, dc, ch 1, dc) at corner (maroon)
Round 3: sc around, 3 sc in each corner (white)
Round 4: (dc, ch 1, sk 1) around, (dc, ch 1, dc, ch 1, dc) at corner (maroon)

Thursday, February 16, 2012

Making Progress: Stitch Eleven

This is a very lacy stitch that was easy to do.  It was obvious where to do each portion of the stitch, and did not require a lot of focus.  This stitch is a little too lacy for my tastes, but if lacy is what you are going for this is not a bad option.  I do like the line of chains going through the stitch (they're yellow in the blanket I made).

The color pattern I used was 2 rows of yellow followed by (2 rows of blue, 2 rows of yellow) repeated.

Here's how to make it:
Chain 93 then work the stitch until work is square.  Add a border and it's done.
Round 1: sc around, 3 sc in each corner (blue)
Round 2: dc around, 5 dc in each corner (blue)
Round 3: dc around, 5 dc in each corner (yellow)
Round 4: dc around, 5 dc in each corner (blue)
Round 5: (sc, ch 3, sk 1) around, (sc, ch 3, sc in same stitch) at corner (blue)

I made this using Lion Brand Pound of Love Pastel Blue and Pastel Yellow with a J hook.

Tuesday, February 14, 2012

Moving the Chains: Stitch Ten!

I make a habit of not watching movies or tv, or really doing anything seated for a protracted period of time without having something to keep my hands busy.  Basically, if I'm not playing cards or eating a meal, I'm crocheting.  Stitch ten was my project for the Super Bowl this year.  While I was working on this, someone asked me if it was a version of the shell stitch.  That made me look at the stitch from a new perspective.  This stitch has no shells in it; it is just clusters made to look like shells, which is pretty cool.  This stitch is lacy and looks complicated, but it is actually fairly simple.  Unlike the previous stitch, it is obvious where to do each component of the stitch.  This makes it easy to make everything line up properly. 

Though I like the stitch, I don't think it is appropriate for a scarf.  Neither a short or long chain scarf would allow the beauty of this stitch to come through.  This stitch worked well in a baby blanket and would be good for a full sized blanket as well.  Time for another story from the Super Bowl party: during a break from crocheting, (probably a trip to the party food table), one of my friends picked up the baby blanket, folded it in half, to make a triangle, and wore it like a shawl. It looked great that way and I suspicion that there is a way to make it triangular without folding it, but that would take some improvising.  In any case, there are many potential uses for this stitch. 

So here's how to make it:
Chain 92, then work the stitch until the work is square.  Add this border and you're done:
Round 1: sc around, 3 sc in each corner
Round 2: dc around, 5 dc in each corner
Round 3: sc around, 3 sc in each corner
Round 4: (sc, ch 3, sk 1) around, (sc, ch 3, sc in same stitch) at corner
I made this from Bernat Satin Sports Rouge with a J hook.

Saturday, February 11, 2012

Stitching away: Stitch Nine!

This is the first stitch in the book that I truly dislike.  It looks so simple yet even after completing an entire baby blanket it is unclear where exactly you do each component of the stitch.  Eventually, I decided to just go with it and accepted that the stitches weren't going to line up correctly.  Unless you are familiar with the craft (and are looking for it), you wouldn't notice the issue, but it was frustrating to no end for me.  What saved this blanket was the yarn: I chose to make this out of some beautiful, silky, variegated yarn.

When I went to take pictures of the finished product I was able to look at it more objectively.  My frustration with the stitch colored my perception of the blanket.  It is prettier than I originally gave it credit.  The stitch is actually fairly simple and lacy, and that is what comes through in the blanket.  (Still, I would never use this stitch again.)

Here's how to make it:
Chain 91 then work the stitch until work is square.  Then add a border:
Round 1: sc around, 3 sc in each corner (gold)
Round 2: sc around, 3 sc in each corner (ombre)
Round 3: sc around, 3 sc in each corner (gold)
Round 4: sc around, 3 sc in each corner (ombre)
Round 5: sc around, 3 sc in each corner (gold)
Round 6: (sc, ch 3, sk 1) around, (sc, ch 3, sc in same stitch) at corner (gold)

The stitch looks the same on both sides, but the border looks different, pictured below.

I made this using Bernat Satin Sport Southwest Ombre and Taupe and a J hook.

Wednesday, February 8, 2012

Tapping right along: Stitch Eight!


Getting back to the Aggie theme, I made this blanket in maroon and white.  This stitch reminds me of the taps that black belts (freshmen and sophomores) wear on their low quarters (highly polished shoes).  This stitch is easy to do because it is obvious where to do each component; there is no guess work.  If you like shell stitches you'll like this stitch because it is essentially a modified shell stitch.  This stitch would make a pretty scarf begun with a short chain.

The color pattern I used is 1 row of white, 2 rows of maroon, then (2 rows of white, 2 rows of maroon) repeated, ending with a single row of white.

Here are the details:
Chain 92, work the stitch until it's square.  Then add the border that is becoming routine:
Round 1: sc around, 3 sc in each corner
Round 2: dc around, 5 dc in each corner
Round 3: sc around, 3 sc in each corner
Round 4: (sc, ch 3, sk 1) around, (sc, ch 3, sc in same stitch) at corner

I used Bernat satin yarn in Bordeaux and Snow with a J hook to make this blanket.


Tuesday, February 7, 2012

Next in line: Stitch Seven!


I found this stitch to be tedious and somewhat time consuming.  I do not intend to ever use this stitch again for anything.  That said, it was not a particularly difficult stitch.  The general effect of this stitch is to create soft cables throughout the fabric.  With some modification, I'd like the stitch better.  The point, however, of this blog is to actually do the stitch as written.  Looking at the finished product, I like the effect of slight cabling, but I would accomplish it with different post stitches in the future.  (Cables are generally made with post stitches.) 

As with most cables, the stitch looks different form each side.  A close up of the cable is shown from the back and then the front sides below.  The front side of the cable is shown in the more panned back photo.

The color pattern I used was 1 row of blue/green followed by 2 rows of orange, (2 rows of blue/green, 2 rows of orange) repeated, and ended with 1 row of blue/green.

So here's how to make it:
Ch 91, then work the stitch until work is square.  Then add this border:
Round 1: sc around, 3 sc in each corner (orange)
Round 2: dc around, 3 sc in each corner (orange)
Round 3: dc around, 3 sc in each corner (blue/green)
Round 4: dc around, 3 sc in each corner (orange)
Round 5: (sc, ch 3, sk 1) around, (sc, ch 3, sc in same stitch) at corner (blue/green)

I made this using Bernat Baby Peach Blossom (orange) and Funny Prints (blue/green) yarn with a  J hook.

Saturday, February 4, 2012

Coming right up: Stitch Six!

Fabric generated from this stitch consists of hexagons inside of diamonds.  This stitch is lacy and elegant; it makes me smile to look at it.  I have used this stitch previously to make scarves beginning with a long chain, and I have begun a full sized blanket out of this stitch.  I like this stitch both because of its appearance and the ease of doing it. After the initial row, it becomes easy to see where to do each part of the stitch. By feel alone you can work the stitch, which makes it great for crocheting while watching movies.

Here’s how I made it:
Ch 93, then work the stitch until the blanket is square.  Then add a border:
Round 1: sc around (3 sc in corner)
Round 2: dc around (5 dc in corner)
Round 3: [dc, ch 1, sk 1] around (dc, ch 1, dc, ch 1, dc in corner)
Round 4: dc around (5 dc in corner)
Round 5: sc around (3 sc in corner)

I made it using Bernat Baby Coordinates in Tangerine Dream with a J hook.

Thursday, February 2, 2012

Now posting: Stitch Five!

This stitch is comprised entirely of post stitches.  Post stitches make fabric stretchy and also thicker.  Previously I have made dish towels and hand towels out of this stitch.  I like the finished product, but I would probably choose a different stitch for baby blankets in the future.  Post stitches are more time consuming than normal stitches because not all of the stitch goes towards making the fabric grow; some of it goes towards making the fabric thicker.  It is wonderful for towels because the extra thickness is beneficial because it means extra absorbance capacity.

The color pattern I used is 2 row of white, then (2 rows of maroon, 2 rows of white) repeated.

Here's how to make it:
Ch 90 then work stitch until work is square and add a border:
Round 1: sc around, 3 sc in each corner
Round 2: dc around, 5 dc in each corner
Round 3: sc around, 3 sc in each corner
Round 4: (sc, ch 3, sk 1) around, (sc, ch 3, sc in same stitch) at corner

I used Bernat satin yarn in Bordeaux and Snow with a J hook to make this blanket.