Showing posts with label Baby Blanket. Show all posts

Friday, January 10, 2014

Bumping Along: Stitch Nine!

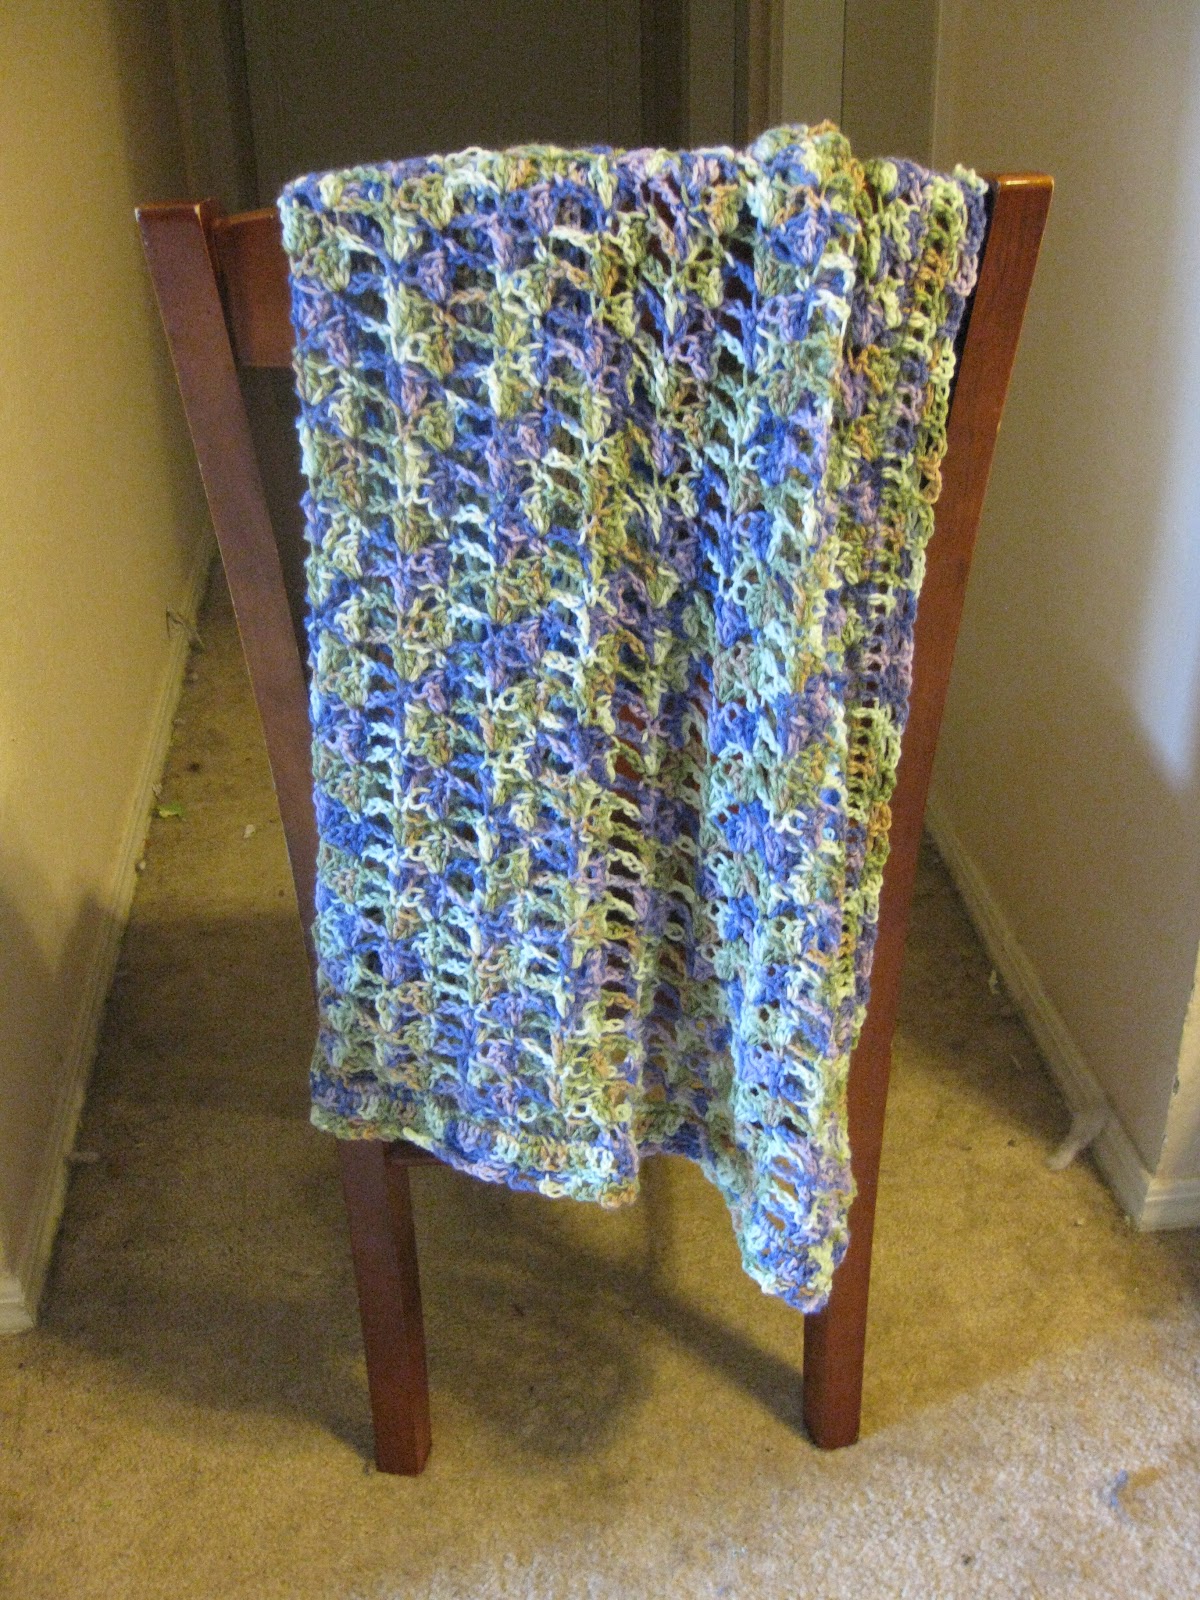
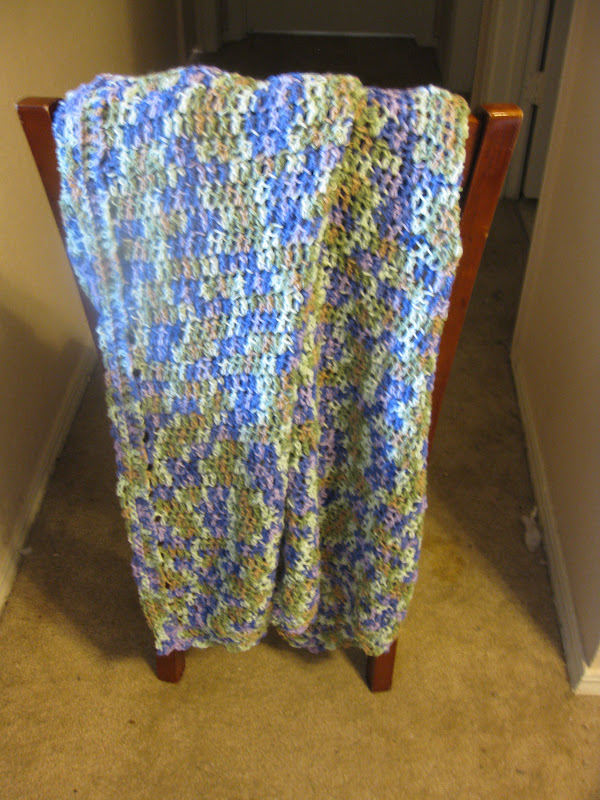
So, back to 50 Stitches for Afghans by Darla Sims.  Today's offering, stitch 9, is somewhat whimsical with offset bumps on one side of the fabric.  It's not a difficult stitch, but it is slow.  Slower than sc in fact.

However, I liked the way it looked and it really is pretty mindless, so it wasn't too bad.  I normally can't stand puff stitches, but for whatever reason I didn't mind them in this pattern.

The color pattern I used for this worked well with the bumps really standing out.  Changing colors every other row would not work well.

I would consider using this stitch for small projects where you want small holes.  Using this stitch to adapt a kid's sweater pattern would be cute.  The bumps would help with scrubbing if you made dishcloths from them.  They would also feel good on your feet as bathmats. 

Color Pattern:
Work (one row in yellow, one row in purple, one row in green) repeated, ending with a row of yellow and the border in purple.

Chain 88, then work stitch until work is square.  Add this border to complete.
Round 1: sc around, 3 sc in corner
Round 2: dc around, 5 dc in corner
Round 3: sc around, 3 sc in corner
Round 4: (sc, ch 3, sk 1) around, (sc, ch 3, sc in same stitch) at corner

I made this with Lion Brand Pound of Love in Soft Pale Green, Soft Pale Yellow, and Soft Lavender with a J hook.

Wednesday, December 18, 2013

A Journey through Spirals: Part Three

So, now I've shown how to do round spirals and rectangular spirals.  It's time to do square spirals.  Squares are basically a combination of circles and rectangles.  They have a definite point of origin like a circle, but with corners like a rectangle.  The challenge is to take a circle and make it angular, or to take a rectangle and make it start out with a simple ch 2.

This was actually a lot more difficult than I expected it to be, but I did come up with something.  The design principles are the same as for rectangles:

1. Corners need 3 sc or 5 dc to be square
2. It's easier to feel a chain 1 than to feel the middle stitch
3. Dc are twice as tall as they are wide

Essentially, this is a rectangle where the initial side consists of only a corner.  So, what you have to do is make a corner in each color in the same chain space, then crochet down the opposite color's corner and make another corner.


Here's that concept written out:
Chain 4
Round 1: (dc, ch 1, 2 dc) in 4th ch from hook with color A.  Attach color B to same ch, (ch 3, dc, ch 1, 2 dc) in same chain

To make sides: dc in post of opposite color's starting ch 3, work corner (2 dc, ch 1, 2 dc) in top of opposite color's starting ch 3.

Round 2: dc around with (2 dc, ch 1, 2 dc) in the ch 1 of corners

Repeat Round 2 until work reaches desired size.

I made this with Bernat Baby Coordinates in Tangerine Dream and Funny Prints with a J hook.

Friday, December 13, 2013

A Journey through Spirals: Part One

A while ago I decided I wanted to try doing spirals.  I of course went to ravelry to find out how to do it.

 The first pattern I found was for a hexagonal blanket.  I grabbed some I Love this Yarn from my stash and got busy.  The initial few rounds are a little awkward, as usual with spirals, but once the work is established it is very quick and particularly mindless.
 
I had decided that I wanted another round blanket for my bed, so I planned on making it fairly large.  I was a little worried about having enough yarn to finish the project when I started.  I only had 3 skeins of pink and 2 skeins of coffee.  However, this pattern does not eat yarn.  The finished blanket only took 1.5 skeins of each color, much less than I had expected.

One problem however, is that a hexagon is not really round.  It is in fact angular with 6 well-defined sides.  Also, I wanted to make the spirals wider.  So, I wasn't really satisfied with this pattern as a round spiral pattern.  I again went looking on ravelry.  This time I found a pattern for a 12-sided blanket using 4 skeins at a time.  This pattern delivered by smoothing out the edges and doubling the width of the spirals.  I used Bernat Baby Coordinates in White and Funny Print, where each color started 2 of the spirals.

However, this pattern is not mindless.  The beginning 9 rounds are all different, and care must be paid to ensure a good result.  Also, throughout the piece, there are 4 skeins of yarn attached at once.  Managing these skeins so that they don't end up a colossal mess of tangled yarn is a difficult, frustrating task.  The finished baby blanket is beautiful, but, at least to me, not worth the headache.

There had to be a way to make this simpler.  I went back to ravelry and found another pattern. This one also was for a 12 sided blanket, but it is much more consistent throughout and only uses 2 skeins at once.  The spirals are not as wide as the previous pattern, but it's not a headache either.  I studied this pattern, but did not decide to actually make it.  Instead, using the knowledge of spirals I had gained from my previous attempts, I came up with my own pattern.  The problem with spirals is the beginning.  Once you get started it is simple and mindless.  So, I redesigned the middle and grew the pattern the same way this pattern did.

Here are the principles I used:
1. To be flat, an initial circle needs 6 sc or 12 dc
2. To have a gradual transition from the first round to the second, the stitches need to get gradually taller in the first round.
3. There will be 12 sides, so there need to be 12 stitches initially.

Here's the result:
Round 1: Ch 2, sc, hdc x2, dc x3 in 2nd chain from hook with color A. Attach color B and sc, hdc x2, dc x3 in same space.
Round 2: (dc, ch 1) in each stitch
Round 3: (2 dc, ch 1) in each stitch
Round 4: dc in each stitch until last dc of the side, (2 dc, ch 1) in last dc of side
Repeat Round 4 for pattern until work reaches desired size.
This pattern makes sense to me, so I think it's easy.  Hopefully this makes sense to other people too.  I used Bernat Baby Coordinates in Tangerine Dream and Funny Prints to make this baby blanket.

Sunday, October 13, 2013

Oops! This Time for Real: Stitch Seven!

Well, I made a mistake last time I posted.  I didn't consult the book, just started typing about the next stitch, and instead of stitch seven, I actually posted about stitch eight.  So here in all its glory is the real stitch seven!

The overall effect of this stitch is to make very angular ripples, at least when you use my color pattern.  Lines of narrow holes run vertically throughout the pattern.  I like this stitch because it makes a distinct ripple pattern, but it does square off at the end, making the addition of a  border not a chore.  It's reasonably fast to work, though never totally mindless.  There are some complicated stitches, though easy to understand, care is needed to not drop loops or pull through too many loops.  Also, whenever you have to do a large number of one stitch in a single spot, counting becomes an issue. 

Although I like this stitch, I still prefer Stitch 4 from Triple Play Pattern Stitches for squared off ripples.   However, it is always nice to have another good option.  This made a nice baby blanket, and would make nice blankets as well.  I think it would make a particularly beautiful shawl, either solid colored or striped.

Without further ado:
Color Pattern:
1 row of white, (2 rows of maroon, 2 rows of white) repeated, ending with a single row of white, and a maroon border.

Chain 90, then work the stitch until work is square.
Add the standard border to complete.

Round 1: sc around, 3 sc in each corner
Round 2: dc around, 5 dc in each corner
Round 3: sc around, 3 sc in each corner
Round 4: (sc, ch 3, sk 1) around, (sc, ch 3, sc in same stitch) at corner

I used Simply Soft yarn in Burgundy and White with a J hook to make this blanket.

Thursday, June 13, 2013

At it again: Stitch Eight!

Trying so many new stitches constantly gets frustrating after a while because when I find one that I like, I picture all of the ways I could use the stitch in various projects.  To then have to immediately move on to an entirely new stitch without making any of the wonderful things I've imagined is not fun.  So, I took a break from investigating new stitches to actually make things other than baby blankets with the good ones I'd already found.

But, now I'm back to trying them out, and have stitch 8.  This stitch is fairly quick and relatively mindless.  It does have a picot stitch in it, which I'm generally not too fond of.  The result of the picot is that it's not completely mindless, and there are little nubs of yarn sticking up at regular intervals along the fabric.  This gives it a whimsical feel.  Though this is not my favorite stitch, it is different enough for it to be potentially useful.  I'm not sure what else I'd use it for, but it does make a nice baby blanket.

The color pattern I used is 2 rows of orange, then (2 rows of green, 2 rows of orange) repeated, with a green border.


In any case, here's the pattern:
Chain 90, then work stitch until work is square.  Add the standard border to complete.
Border:
Round 1: sc around, 3 sc in corner
Round 2: dc around, 5 dc in corner
Round 3: sc around, 3 sc in corner
Round 4: (sc, ch 3, sk 1) around, (sc, ch 3, sc in same stitch) at corner

I made this with Lion Brand Pound of Love baby yarn in Pastel Green and Cream-sickle with a J hook.

Wednesday, April 3, 2013

Puffing Along: Stitch Six!

Stitch six is the next installment in this series.  It grows fairly rapidly and produces a pretty, lacy fabric.  If you like puff stitches, this one is worth trying.  Personally, I don't like puff stitches, so I'm not really a fan of this one.  There is so much variation in puff stitches because each person does them differently, having different tensions in the thread.  Mine naturally come out tight, thick, and stumpy.  I have to consciously think about each stitch to make them looser.  My friend Lynnette makes light and puffy puff stitches, so I know it's doable, just not for me.  I doubt I'll reuse this stitch as written.  I conceivably would reuse it if I replaced the puff stitches with clusters.

Here's the pattern:
Chain 91, then work stitch until it's square.  Add the normal border to complete.
Round 1: sc around, 3 sc in corner
Round 2: dc around, 5 dc in corner
Round 3: sc around, 3 sc in corner
Round 4: (sc, ch 3, sk 1) around, (sc, ch 3, sc in same stitch) at corner

I made this with Baby Bee Sweet Delight yarn in Precious Ombre and a J hook.


Monday, April 1, 2013

Back to it: Stitch Five!

Getting back to 50 Stitches for Afghans, here's stitch five.  Normally, I would have tried this in a different color pattern than that found in the book, but not for this one.  The point of this stitch is to have essentially a grid of tiles, some solid, some not.  Having multiple colors would distract from this, so I decided to make it a solid color.  The stitch itself is easy to work and grows at the speed of dc, which is nice.  I like the overall effect of this stitch, but I'm not sure what I'd use it for.  It would make a pretty tablecloth if you were willing to work with small thread. 

In any case, here's what I did

:
Chain 87, then work stitch until square.  Add the standard border to finish.
Round 1: sc around, 3 sc in corner
Round 2: dc around, 5 dc in corner
Round 3: sc around, 3 sc in corner
Round 4: (sc, ch 3, sk 1) around, (sc, ch 3, sc in same stitch) at corner

I made this with Bernat Baby Coordinates Tangerine Dream yarn and a J hook.

Thursday, February 21, 2013

Skating along: Stitch Four!

This was a stitch I was looking forward to trying out and it did not disappoint.  The picture in the book of a solid colored version is pretty, but I like the three color version I tried.  It's a happy and somewhat whimsical stitch that makes for good baby blankets, blankets, and scarves.  It's somewhat lacy, but not overly so.  The color combination, along with the stitch itself reminds me of lollipops.  I will definitely use this stitch again.


Color Pattern:
(1 row of yellow, 1 row of orange, 1 row of purple) repeated, ending with a row of orange; the border is purple.

Here's the pattern:
Chain 88, then work stitch until square.  Add the standard border and you're done.
Round 1: sc around, 3 sc in corner
Round 2: dc around, 5 dc in corner
Round 3: sc around, 3 sc in corner
Round 4: (sc, ch 3, sk 1) around, (sc, ch 3, sc in same stitch) at corner

I made this with Lion Brand Pound of Love yarn in Lavender, Cream-sickle,and Pastel Yellow with a J hook.

Tuesday, February 5, 2013

And then: Stitch Three!

In the interest of trying out new color patterns, I tried this one striped in maroon and white.  I'm not overly fond of the result;  it looks a little messy and thrown together, or at least that was my impression as I worked it.  However, I think that's simply the result of the striping pattern.  If it was one color, like it is in the book, it would be gorgeous.  It's not overly complicated or difficult to do, and it grows at a reasonable pace.  I'll probably reuse this but using only one color in the future.  It would be good for scarves, shawls, baby blankets, and afghans.  I'll probably make an afghan out of it at some point. 
In any case, here are the details:
Color pattern:
2 rows of white, (2 rows of maroon, 2 rows of white) repeated, ending with 1 row of maroon.  Border is maroon.
Chain 92, then work the stitch until work is square.  Add the border and you're done.
Round 1: sc around, 3 sc in corner
Round 2: dc around, 5 dc in corner
Round 3: sc around, 3 sc in corner
Round 4: (sc, ch 3, sk 1) around, (sc, ch 3, sc in same stitch) at corner

I made this with Bernat Satin yarn in Bordeaux and Snow with a J hook.

Saturday, February 2, 2013

Naturally next: Stitch Two!

My first impression of this stitch was not favorable.  Based on the swatch shown in the book I thought it was going to be too open, and somewhat boring on top of that.  I was pleasantly surprised when I tried it; it's actually a stitch I conceivably would use again.  It's quick, easy, and essentially mindless.  The striping pattern is what keeps it from being boring.

Color pattern:
2 rows of white, (2 rows of maroon, 2 rows of white) repeated, ending with 1 row of maroon.  Border is maroon.

Chain 90, then work stitch until square.  Add the border to finish it.
Round 1: sc around, 3 sc in corner
Round 2: dc around, 5 dc in corner
Round 3: sc around, 3 sc in corner
Round 4: (sc, ch 3, sk 1) around, (sc, ch 3, sc in same stitch) at corner

I made this with Bernat Satin yarn in Bordeaux and Snow with a J hook.

Tuesday, January 29, 2013

Here we go again: Stitch One!

This first stitch I really like and will likely reuse.  It's consistent and a good mix of solid and lacy.  It's also fast: it grows at the speed of dc, and is essentially mindless.  The baby blanket I made from it is really nice, and it would be appropriate for scarves, afghans, shawls etc.  Additionally, basically any color striping pattern you'd want to try out would work with this stitch.  The pattern for this stitch is easy to read, and would be a good one to start on if you're not confident in your ability to decipher crochet-script.  This stitch gets my ringing endorsement for both novices and experts alike.

Here's the pattern:
Chain 93, then work the stitch until fabric is square.  Add the standard baby blanket border to finish.
Round 1: sc around, 3 sc in corner
Round 2: dc around, 5 dc in corner
Round 3: sc around, 3 sc in corner
Round 4: (sc, ch 3, sk 1) around, (sc, ch 3, sc in same stitch) at corner

I made this with Lion Brand Pound of Love yarn in Lavender with a J hook.

Sunday, December 23, 2012

Shell Stitch 10101

I knew intuitively that this stitch would be good.  It has the same appearance as a normal shell stitch except you can actually see the individual stitches.  That alone makes it beautiful.  From a little further back, you can see the seemingly intricate network created by the stitch.  I like it because it is consistently solid throughout without being completely solid, if that makes any sense.  It's not a really dense stitch, but it is evenly covered, with no large holes.   I tested this out by making a baby blanket from it, which turned out great. 

Here's the stitch pattern:
Chain a multiple of 6 + 5
Row 1: sc in 2nd ch from hook, (sk 2, [dc, ch 1, dc, ch 1, dc] in next ch, sk 2, sc) across, [dc, ch 1, dc] in last ch
Row 2: ch 1, turn, sc, ([dc, ch 1, dc, ch 1, dc] in sc, sc in middle dc) across, [dc, ch 1, dc] in last sc

Repeat Row 2 for pattern 

And here's the baby blanket pattern:
Chain 95, then work stitch 10101 until work is square.
Add this border to complete it:
Round 1: sc around, 3 sc in each corner
Round 2: dc around, 5 dc in each corner
Round 3: sc around, 3 sc in each corner
Round 4: (sc, ch 3, sk 1) around, (sc, ch 3, sc in same stitch) at corner

I made this with Bernat Baby Peach Blossom and a J hook. 

Tuesday, October 16, 2012

Shell Stitch 01110

 This was actually one of the first stitches I tried out back in July.  I finished the baby blanket, then put it aside because it would be a while til it came up.  Unfortunately, I lost track of it and had failed to photograph it.  I was getting ready to just make a swatch so I could post again when I found it!  So, here it is, in all its glory. 

Here's the stitch pattern:
Chain a multiple of 6 + 5
Row 1: sc in 2nd ch from hook, (ch 1, sk 2, 3 dc in next ch, ch 1, sk 2, sc) across, [ch 1,  2 dc] in last ch
Row 2: ch 1, turn, sc, (ch 1, 3 dc in sc, ch 1, sc in ch 1 space) across, [ch 1, 2 dc] in last sc

Repeat Row 2 for pattern 

And here's the baby blanket pattern:
Chain 95, then work the above stitch until it is square. 
Last row: ch 1, turn, sc in first 2 dc, (hdc in ch 1 sp, hdc in sc, hdc in ch 1, sp, sc in next 3 dc) across, hdc in last ch 1 sp, hdc in last sc

Border:
Round 1: sc around, 3 sc in each corner
Round 2: dc around, 5 dc in each corner
Round 3: sc around, 3 sc in each corner
Round 4: (sc, ch 3, sk 1) around, (sc, ch 3, sc in same stitch) at corner

I made this with Baby Bee Sweet Delight Pomp Iris Dream yarn and a J hook.

Monday, August 13, 2012

Open Hexagons Baby Blanket

So, I tried out the Open Hexagons stitch, which is a combination of the simple shell stitch, and the 00100 shell stitch, by making a baby blanket.  I intended to make it an Aggie blanket by adding white in the border, but I decided to just have it be a solid maroon blanket.

Here's the pattern:
Chain 92, then work the aforementioned stitch until work is square. 
Row 1: sc in 2nd ch from hook, (sk 2, 5 dc in next ch, sk 2, sc) across
Row 2: ch 3, turn, 2 dc in first sc, sk 2, (sc in dc, ch 2, sk 2, dc in sc, ch 2 sk 2, sc, sk 2, 5 dc) across, 3 dc in last sc
Row 3: ch 1, turn, sc in dc, (sk 2, 3 dc in sc, ch 2 , sk 2, sc, ch 2, sk 2, 3 dc, sk 2, sc) across, sc in last dc
Row 4: repeat Row 2
Row 5: ch 1, turn, sc in dc, (sk 2, 5 dc in sc, sk 2, sc in dc) across, sc in last dc
Row 6: ch 3, turn, 2 dc in first sc, (sk 2, sc in dc, sk 2, 5 dc in sc, sk 2, sc in dc, ch 2, sk 2, dc in sc, ch 2) across, 3 dc in last sc
Row 7: ch 1, turn, sc in dc, sk 2, 5 dc in sc, (sk 2, sc in dc, sk 2, 3 dc in sc, ch 2, sk 2, sc in dc, ch 2, sk 2, 3 dc in sc) across, sc in last dc
Row 8 : repeat Row 6
Row 9: repeat Row 5

Repeat Rows 2-9 for pattern, ending with row 5.

Add the standard border:
Round 1: sc around, 3 sc in each corner
Round 2: dc around, 5 dc in each corner
Round 3: sc around, 3 sc in each corner
Round 4: (sc, ch 3, sk 1) around, (sc, ch 3, sc in same stitch) at corner

I made this with Bernat Satin yarn in Bordeaux and a J hook.

Monday, July 2, 2012

Spaced Shell Baby Blankets

You might have been wondering what the other two examples of the Spaced Shell stitch are.  If you thought they're baby blankets, you're right!  I made them exactly the same except in the color scheme.  The Aggie blanket, was made using the half and half color pattern, and the Banana Pudding baby blanket was made using the equal thirds color pattern. The yellow, brown, and white work really well together to look like banana pudding. 

Aggie color pattern:
Work rows 1, 4, and 5 in white, and 2 and 3 in maroon, with a maroon border.

Banana Pudding color pattern:
Start with white, then brown, then yellow, changing every row, ending with a white row, and a brown border.


Here's the pattern;
Chain 95, then work stitch as described here until work is square.
Row 1: sc in 2nd ch from hook, sk 2, (5 dc in next ch, sk 2, sc, sk 2) across, 3 dc in last ch
Row 2: ch 1, turn, sc in dc, ch 2, sk 2, (dc in sc, ch 2, sk 2, sc in dc, ch 2, sk 2) across, dc in last sc
Row 3: ch 3, turn, 2 dc in dc, (sc in sc, 5 dc in dc) across, sc in last sc
Row 4: ch 5, turn, sk 2,(sc in dc, ch 2, sk 2, dc in sc, ch 2, sk 2) across, sc in last dc
Row 5: ch 1, turn, sc in sc, (5 dc in dc, sc in sc) across, 3 dc in last dc

Repeat Rows 2-5 for pattern, ending with Row 4. 
 
Border:
Round 1: sc around, 3 sc in corner
Round 2: dc around, 5 dc in corner
Round 3: sc around, 3 sc in corner
Round 4: (sc, ch 3, sk 1) around, (sc, ch 3, sc) in corner
 
These blankets were made using a J hook.  The Aggie blanket was made using Bernat Satin yarn in Bordeaux and Snow, and the Banana Pudding blanket was made using Bernat Satin yarn in Sable, Banana, and Snow.  

Wednesday, June 6, 2012

More Baby Blankets!


So, since I just keep churning out baby blankets, mostly from the book I reviewed, I'm going to just combine a couple so that this doesn't get monotonous.  This time I used stitches one and two to make baby blankets.  I figured that it was time I use stitch 1 again, seeing as how I have proclaimed it one of my two favorites in the book.  Stitch 2 is just great because it is so simple and works so well with variegated yarn.


Just so you know, you can get a preview of the book by clicking 'look inside' on the amazon page, here.  It will show you the first three stitch patterns.

Anyway, here are the patterns.
For the stitch one baby blanket:
Chain 94, then work the stitch until square.
The color pattern I used is 1 row of yellow, 2 rows of purple, then (2 rows of yellow, 2 rows of purple) repeated, ending with a single row of yellow.  Add the standard border in purple:
Round 1: sc around, 3 sc in each corner
Round 2: dc around, 5 dc in each corner
Round 3: sc around, 3 sc in each corner

Round 4: (sc, ch 3, sk 1) around, (sc, ch 3, sc in same stitch) at corner

I made this using Lion Brand Pound of Love baby yarn in Pastel Yellow and Lavender with a J hook.

For the stitch two baby blanket:
Ch 90, then work the stitch until square.  Add the border, and you're done:
Round 1: sc around, 3 sc in corner
Round 2: dc around, 5 dc in corner
Round 3: sc around, 3 sc in corner
Round 4: (sc, ch 3, sk 1) around, (sc, ch 3, sc) in corner

I made this using Baby Bee Sweet Delights 'Sugar Plum Camo' yarn with a J hook.

Friday, June 1, 2012

Shell Grid Baby Blanket

So, a while ago, I started to make a shell baby blanket, and got bored with it early on.  So I decided to experiment a little with having a little bit of a built in border.  I worked shell stitches on the top and bottom and edges of the blanket, then simply made a grid for the interior.  At the edges I did 3 dc and a sc.  If it was sc, 3 dc, then the height of the grid for that row was a dc; in the other case, where it was 3 dc, sc, then the height fo the grid for that row was a sc.  The gird therefore alternates in height, producing, I think, a more interesting effect than a plane grid.  In any case, I had made the body entirely out of white, and I wanted it to be an Aggie blanket, so I did a wider than normal border (7 rounds instead of 4) in maroon to balance out the white. 

I am quite pleased with the result of my little experiment.  However, I would caution anyone considering doing a built in border that they are much more complicated than a traditional border.  Much more thought and planning must occur.  One of the reasons I prefer crocheting to knitting is that crocheting is more free form and requires much less planning.  This undoes that a little bit.  If you only do a built in border, the final width of your project is set when  you make your chain, and you have to start and finish with the appropriate rows.  The most difficult part of this project was figuring out how to do the last couple of rows. 

Stitch Definitions:
Half of a double crochet: YO, pull up a loop, pull through 2 loops on hook

Reverse Shell: pull up a loop through dc, work half a dc around the ch 3, work half of a dc in sc, work half of a dc around ch 3, pull up a loop through dc, pull through all 6 loops on hook

Here's the pattern:
Body: (white)
Chain 98
Row 1: sc in 2nd chain from hook, (sk 2, 5 dc in next ch, sk 2, sc) across
Row 2: ch 3, turn, 2 dc in sc, sk 2, sc in dc, (ch 2, sk 2, dc in sc, ch 2, sk 2, sc in dc) across, sk 2, 3 dc in last sc
Row 3: ch 1, turn, sc in first dc, sk 2, 3 dc in sc, (ch 2, dc in dc, ch 2, dc in sc) across, 3 dc in last sc, sk 2, sc in last dc
Row 4: ch 3, turn, 2 dc in sc, sk 2, sc in dc, (ch 2, sc in dc) across, sk 2, 3 dc in last sc
Row 5: ch 1, turn, sc in first dc, sk 2, 3 dc in sc, (ch 2, dc in sc) across, 3 dc in last sc, sk 2, sc in last dc

Repeat Rows 4 and 5 until work is square

2nd to last row: ch 3, turn, 2 dc in sc, sk 2, sc in dc, (ch 3, sc in dc, ch 3, dc in dc) across, sk 2, 3 dc in last sc
Last Row: ch 1, turn, sc in first dc, (ch 2, Reverse Shell, ch 2, sc) across

Border: (maroon)
Round 1: sc around, 3 sc in corner
Round 2: dc around, 5 dc in corner
Round 3: sc around, 3 sc in corner
Round 4: (dc, ch 1, sk 1) around, (dc, ch 1, dc, ch 1, dc) in corner
Round 5: sc around, 3 sc in corner
Round 6: dc around, 5 dc in corner
Round 7: sc around, 3 sc in corner


I made this using Bernat Satin Bordeaux and Snow and a J hook.

Tuesday, May 22, 2012

Star Lattice Baby Blanket

So, my last post showed you the star lattice stitch pattern.  It's a simple stitch with a little twist.  In variegated yarn it messes up the self striping patterns that tend to develop.  That makes it so that you can actually see the pattern.  Here's a baby blanket I made from it.

Here's how to make it:
Chain 91:
Row 1: dc in 4th chain from hook, dc across
Row 2: ch 3, turn, dc across
Row 3: ch 3, turn, star stitch across
Rows 4-5: ch 3, turn, dc across

Repeat rows 3-5 until work is square.  Add the standard border and you're done:
Round 1: sc around, 3 sc in each corner
Round 2: dc around, 5 dc in each corner
Round 3: sc around, 3 sc in each corner
Round 4: (sc, ch 3, sk 1) around, (sc, ch 3, sc) in corner

I made this with Baby Bee 'Sugar Plum Camo' yarn with a J hook.

Friday, May 18, 2012

And again with the Stitch 28!

Well, I'm continuing to make baby blankets and I really like stitch 28 for making them, especially with variegated yarn.  This stitch is great for baby blankets because it is so simple, fast, and easy.  It also is mostly solid but not overly so.  There are some gaps, giving it a touch of delicacy.  This stitch is lacy strength.  I obviously really like this stitch or I would not have made three baby blankets from it.

I made it exactly like the previous two baby blankets (original and revisited) from this stitch.

Once again, here's the pattern:
Round 1: sc around, 3 sc in each corner
Round 2: dc around, 5 dc in each corner
Round 3: sc around, 3 sc in each corner
Round 4: (sc, ch 3, sk 1) around, (sc, ch 3, sc in same stitch) at corner

I made this using Bernat Baby Coordinates, Candy Baby with a J hook.

Friday, May 11, 2012

Stitch 2 Revisited

In an effort to use up my stash of variegated baby yarn, I am going back through the book and picking out stitches that lend themselves to variegation and making more baby blankets.  Stitch 2 is pretty and dramatic with variegated yarn because there is such a change in amount of yarn used per unit length.  There are sc, dc, and stretches of chains.  This means that the colors do not end up in rigid patterns.  There is a riot of color in this blanket.  I used the same yarn for this blanket as I did for the Rainbow Shell baby blanket.  Basically, if you are going to use variegated yarn, embrace the color changes, use it to your advantage.  I think this came out beautifully.


This baby blanket differs from the stitch 2 baby blanket in the yarn that I used and the border. 


Here's the pattern:
Ch 90, then work the stitch until the blanket is square.  Add the standard border and you're done.
Round 1: sc around, 3 sc in each corner
Round 2: dc around, 5 dc in each corner
Round 3: sc around, 3 sc in each corner
Round 4: (sc, ch 3, sk 1) around, (sc, ch 3, sc in same stitch) at corner

I made this with Bernat Baby Coordinates Candy Baby yarn with a J hook.