Well that's the end of my journey with spirals. I figured out how to make the shapes that interested me in a satisfying manner. The only thing still lacking is to figure out how to make the spirals wider without having to attach more balls of yarn.
I just had a thought about that! Why not just make taller stitches? Like instead of dc (2c), use 5c, or for even bigger ones 10c (these numbers are totally arbitrary). The obvious problem is that there will be gaping holes. That can be solved by using linked stitches. The corners would be interesting to figure out, but probably doable.
Anyway, now that that rabbit trail is over, let's summarize what I've explained about spirals.
I've found or written up patterns for the following shapes:
Circles (really 12 sided polygons)
Hexagons
Rectangles
Squares
This is hardly an exhaustive list of shapes. As I write this, I realized that triangular spirals are also possible. Any shape, at least regular polygons, can be made with spirals. Hopefully you can figure out how to make a heptagon spiral if you really want to by looking at the principles for the more normal shapes.
Showing posts with label Technique. Show all posts
Showing posts with label Technique. Show all posts
Sunday, December 22, 2013
Wednesday, December 18, 2013
A Journey through Spirals: Part Three
So, now I've shown how to do round spirals and rectangular spirals. It's time to do square spirals. Squares are basically a combination of circles and rectangles. They have a definite point of origin like a circle, but with corners like a rectangle. The challenge is to take a circle and make it angular, or to take a rectangle and make it start out with a simple ch 2.
This was actually a lot more difficult than I expected it to be, but I did come up with something. The design principles are the same as for rectangles:
1. Corners need 3 sc or 5 dc to be square
2. It's easier to feel a chain 1 than to feel the middle stitch
3. Dc are twice as tall as they are wide
Essentially, this is a rectangle where the initial side consists of only a corner. So, what you have to do is make a corner in each color in the same chain space, then crochet down the opposite color's corner and make another corner.

Here's that concept written out:
Chain 4
Round 1: (dc, ch 1, 2 dc) in 4th ch from hook with color A. Attach color B to same ch, (ch 3, dc, ch 1, 2 dc) in same chain
To make sides: dc in post of opposite color's starting ch 3, work corner (2 dc, ch 1, 2 dc) in top of opposite color's starting ch 3.
Round 2: dc around with (2 dc, ch 1, 2 dc) in the ch 1 of corners
Repeat Round 2 until work reaches desired size.
I made this with Bernat Baby Coordinates in Tangerine Dream and Funny Prints with a J hook.
This was actually a lot more difficult than I expected it to be, but I did come up with something. The design principles are the same as for rectangles:
1. Corners need 3 sc or 5 dc to be square
2. It's easier to feel a chain 1 than to feel the middle stitch
3. Dc are twice as tall as they are wide
Essentially, this is a rectangle where the initial side consists of only a corner. So, what you have to do is make a corner in each color in the same chain space, then crochet down the opposite color's corner and make another corner.
Here's that concept written out:
Chain 4
Round 1: (dc, ch 1, 2 dc) in 4th ch from hook with color A. Attach color B to same ch, (ch 3, dc, ch 1, 2 dc) in same chain
To make sides: dc in post of opposite color's starting ch 3, work corner (2 dc, ch 1, 2 dc) in top of opposite color's starting ch 3.
Round 2: dc around with (2 dc, ch 1, 2 dc) in the ch 1 of corners
Repeat Round 2 until work reaches desired size.
I made this with Bernat Baby Coordinates in Tangerine Dream and Funny Prints with a J hook.
Monday, December 16, 2013
A Journey through Sprials: Part Two
Last time, I went through my endeavors to make a round spiral blanket. Well, what limits spirals to round or semi-round things. This time I decided to make a rectangle. Again, the issue is beginning.
Here are the design principles I used:
1. Corners need 3 sc or 5 dc to be square
2. It's easier to feel a chain 1 than to feel the middle stitch
3. Dc are twice as tall as they are wide
Here's what I came up with:

 With Color A, chain a number of chains such that the length equals the difference you want in the length and width of the finished product. For instance, if you want to make a twin-sized blanket, typically 75"x90", then the difference is 15". Your chain should measure 15". This is only an approximation because work does tend to stretch the starting chain, but it's a starting point.
Round 1: dc in 4th ch from hook and in each ch across with color A. Attach Color B to back side of chain (at the beginning of the chain, where the little bit of string is hanging off, where you've just crocheted back to with Color A). Ch 3 and dc across.
To make a corner: (2 dc, ch 1, 2 dc) in last ch
To make sides: dc in post of first dc of opposite color. Make corner in top of first dc of opposite color. These sides should be 5 dc in length (2 for each corner and 1 for the height of the initial dc)
Round 2: dc around with (2 dc, ch 1, 2 dc) in the ch 1 of corners
Repeat Round 2 until work reaches desired size.
Here are the design principles I used:
1. Corners need 3 sc or 5 dc to be square
2. It's easier to feel a chain 1 than to feel the middle stitch
3. Dc are twice as tall as they are wide

 With Color A, chain a number of chains such that the length equals the difference you want in the length and width of the finished product. For instance, if you want to make a twin-sized blanket, typically 75"x90", then the difference is 15". Your chain should measure 15". This is only an approximation because work does tend to stretch the starting chain, but it's a starting point.
Round 1: dc in 4th ch from hook and in each ch across with color A. Attach Color B to back side of chain (at the beginning of the chain, where the little bit of string is hanging off, where you've just crocheted back to with Color A). Ch 3 and dc across.
To make a corner: (2 dc, ch 1, 2 dc) in last ch
To make sides: dc in post of first dc of opposite color. Make corner in top of first dc of opposite color. These sides should be 5 dc in length (2 for each corner and 1 for the height of the initial dc)
Round 2: dc around with (2 dc, ch 1, 2 dc) in the ch 1 of corners
Repeat Round 2 until work reaches desired size.
Friday, December 13, 2013
A Journey through Spirals: Part One
A while ago I decided I wanted to try doing spirals. I of course went to ravelry to find out how to do it.
The first pattern I found was for a hexagonal blanket. I grabbed some I Love this Yarn from my stash and got busy. The initial few rounds are a little awkward, as usual with spirals, but once the work is established it is very quick and particularly mindless.
 I had decided that I wanted another round blanket for my bed, so I planned on making it fairly large. I was a little worried about having enough yarn to finish the project when I started. I only had 3 skeins of pink and 2 skeins of coffee. However, this pattern does not eat yarn. The finished blanket only took 1.5 skeins of each color, much less than I had expected.
One problem however, is that a hexagon is not really round. It is in fact angular with 6 well-defined sides. Also, I wanted to make the spirals wider. So, I wasn't really satisfied with this pattern as a round spiral pattern. I again went looking on ravelry. This time I found a pattern for a 12-sided blanket using 4 skeins at a time. This pattern delivered by smoothing out the edges and doubling the width of the spirals. I used Bernat Baby Coordinates in White and Funny Print, where each color started 2 of the spirals.

However, this pattern is not mindless. The beginning 9 rounds are all different, and care must be paid to ensure a good result. Also, throughout the piece, there are 4 skeins of yarn attached at once. Managing these skeins so that they don't end up a colossal mess of tangled yarn is a difficult, frustrating task. The finished baby blanket is beautiful, but, at least to me, not worth the headache.
There had to be a way to make this simpler. I went back to ravelry and found another pattern. This one also was for a 12 sided blanket, but it is much more consistent throughout and only uses 2 skeins at once. The spirals are not as wide as the previous pattern, but it's not a headache either. I studied this pattern, but did not decide to actually make it. Instead, using the knowledge of spirals I had gained from my previous attempts, I came up with my own pattern. The problem with spirals is the beginning. Once you get started it is simple and mindless. So, I redesigned the middle and grew the pattern the same way this pattern did.
Here are the principles I used:
1. To be flat, an initial circle needs 6 sc or 12 dc
2. To have a gradual transition from the first round to the second, the stitches need to get gradually taller in the first round.
3. There will be 12 sides, so there need to be 12 stitches initially.
Here's the result:
Round 1: Ch 2, sc, hdc x2, dc x3 in 2nd chain from hook with color A. Attach color B and sc, hdc x2, dc x3 in same space.
Round 2: (dc, ch 1) in each stitch
Round 3: (2 dc, ch 1) in each stitch
Round 4: dc in each stitch until last dc of the side, (2 dc, ch 1) in last dc of side
Repeat Round 4 for pattern until work reaches desired size.

The first pattern I found was for a hexagonal blanket. I grabbed some I Love this Yarn from my stash and got busy. The initial few rounds are a little awkward, as usual with spirals, but once the work is established it is very quick and particularly mindless.

One problem however, is that a hexagon is not really round. It is in fact angular with 6 well-defined sides. Also, I wanted to make the spirals wider. So, I wasn't really satisfied with this pattern as a round spiral pattern. I again went looking on ravelry. This time I found a pattern for a 12-sided blanket using 4 skeins at a time. This pattern delivered by smoothing out the edges and doubling the width of the spirals. I used Bernat Baby Coordinates in White and Funny Print, where each color started 2 of the spirals.

However, this pattern is not mindless. The beginning 9 rounds are all different, and care must be paid to ensure a good result. Also, throughout the piece, there are 4 skeins of yarn attached at once. Managing these skeins so that they don't end up a colossal mess of tangled yarn is a difficult, frustrating task. The finished baby blanket is beautiful, but, at least to me, not worth the headache.
There had to be a way to make this simpler. I went back to ravelry and found another pattern. This one also was for a 12 sided blanket, but it is much more consistent throughout and only uses 2 skeins at once. The spirals are not as wide as the previous pattern, but it's not a headache either. I studied this pattern, but did not decide to actually make it. Instead, using the knowledge of spirals I had gained from my previous attempts, I came up with my own pattern. The problem with spirals is the beginning. Once you get started it is simple and mindless. So, I redesigned the middle and grew the pattern the same way this pattern did.
Here are the principles I used:
1. To be flat, an initial circle needs 6 sc or 12 dc
2. To have a gradual transition from the first round to the second, the stitches need to get gradually taller in the first round.
3. There will be 12 sides, so there need to be 12 stitches initially.
Here's the result:
Round 1: Ch 2, sc, hdc x2, dc x3 in 2nd chain from hook with color A. Attach color B and sc, hdc x2, dc x3 in same space.
Round 2: (dc, ch 1) in each stitch
Round 3: (2 dc, ch 1) in each stitch
Round 4: dc in each stitch until last dc of the side, (2 dc, ch 1) in last dc of side
Repeat Round 4 for pattern until work reaches desired size.
This pattern makes sense to me, so I think it's easy. Hopefully this makes sense to other people too. I used Bernat Baby Coordinates in Tangerine Dream and Funny Prints to make this baby blanket.
Thursday, August 16, 2012
Storytime: Stress Relief Gloves!
Got a story for you! Last spring I decided to make a baby blanket for a friend, but I had to have it done in time for me to take it with me on the plane in less than a week. I had been crocheting for about a year at this point, and wasn't as fast I am now, so this was a problem. Another issue was that I was using a G hook for this blanket. I use a J hook for just about everything, so this was a departure for me. Added to that was the difficulty in the pattern I was using. It was the Little Snowballs pattern and it has an odd stitch in it. Anyway, all of this combined to make my hands hurt dreadfully. It got so bad that even when I wasn't doing anything they still hurt. Crocheting aggravated it further, but I just couldn't put down my hook long enough for my hands to heal. This went on for a full month.

At this point I was willing to try just about anything, so when I saw these stress relief gloves I decided to give them a shot. I didn't expect them to work; I still don't know why they work, but they do! They had an amazing effect upon my hands. Initially I slept with them on, and I'd wake up and my hands would actually feel great. Not just not in pain, but noticeably good. Within a very short time my hands were feeling good again, and I could crochet without pain.
I highly recommend these gloves to anyone with hand pain, or anyone in general because they actually work! I wear them whenever I crochet because I want to prevent that horrible pain from ever coming back. It's been over a year since I started using them, and I've not had a problem. I'm also more conscious of when my hands start to hurt. I've found that I can crochet about twice as long if I wear these gloves than I could without them. However, they do wear out, and by that I mean, they stretch out, become looser, and aren't as effective. I think I've gone through 3 pairs in a year, so they last for a while. The more you use them the quicker they'll wear out, so if you don't crochet like crazy like I do they'll last longer for you.
I know that Joanns and AC Moore sell these gloves: "Lion Brand Stress Relief Gloves". Last I checked, they were $15 at Joanns and $22 at AC Moore. With a 50% off coupon, they're only $7.50 at Joanns and they last for months. You can of course buy them online, but you really need to get the right size. There's a sizing guide on the back of the package that's really easy to use.
Since they are bright blue, fingerless gloves, they look a little odd to most people. It seems like every time I use them around other people, I get asked about them. People are curious about them. There are of course, other brands of these gloves, but I have only tried Lion Brand's and I know they work. Plus, the Crochet Dude's version make it look like you have tattoos of their logo on your hands, which I think looks tacky.
I thought this was an appropriate time to bring these gloves up because making the Speedy Afghan in only 6 days was something I never could have done without these gloves. My hands would have given out and made it impossible to do this.
Thursday, August 9, 2012
Open Hexagons Stitch

So, in my last post, I observed that there are hexagons in fabric made with stitch 00100. I decided to diagram it and figure out how it would end up. That diagram is pictured to the right. Note that the written pattern had to be tweeked a bit when I actually worked the pattern. That was merely the first draft, but I thought y'all might want to see it. It occurred to me as I was working on this, that this is similar to filet crochet. There is a grid where you can have holes or fill them in to create a pattern. This is simply a different grid, made up out of triangles. In this case, filled in means 3 dc, and holes are just a ch 2 and a dc. Unlike traditional filet crochet, diagonal edges are inherent in the grid. To make patterns this way, I'd recommend using a more precise grid than I did.

Here's the complete pattern:
Chain a multiple of 6 + 2
Row 1: sc in 2nd ch from hook, (sk 2, 5 dc in next ch, sk 2, sc) across
Row 2: ch 3, turn, 2 dc in first sc, sk 2, (sc in dc, ch 2, sk 2, dc in sc, ch 2 sk 2, sc, sk 2, 5 dc) across, 3 dc in last sc
Row 3: ch 1, turn, sc in dc, (sk 2, 3 dc in sc, ch 2 , sk 2, sc, ch 2, sk 2, 3 dc, sk 2, sc) across, sc in last dc
Row 4: repeat Row 2
Row 5: ch 1, turn, sc in dc, (sk 2, 5 dc in sc, sk 2, sc in dc) across, sc in last dc
Row 6: ch 3, turn, 2 dc in first sc, (sk 2, sc in dc, sk 2, 5 dc in sc, sk 2, sc in dc, ch 2, sk 2, dc in sc, ch 2) across, 3 dc in last sc
Row 7: ch 1, turn, sc in dc, sk 2, 5 dc in sc, (sk 2, sc in dc, sk 2, 3 dc in sc, ch 2, sk 2, sc in dc, ch 2, sk 2, 3 dc in sc) across, sc in last dc
Row 8 : repeat Row 6
Row 9: repeat Row 5
Repeat Rows 2-9 for pattern, ending with either row 5 or row 9.
Here's a simplification of the pattern:
Row 1: shell across
Row 2: (filled, open) across
Row 3: repeat Row 2
Row 4: repeat Row 2
Row 5: shell across
Row 6: filled, (filled, open) across
Row 7: repeat Row 6
Row 8 : repeat Row 6
Row 9: repeat Row 5
Quick definitions
Filled means either (sc, 5 dc, sc) for even rows or (3 dc, sc, 3 dc) for odd rows
Open means either (sc, ch 2, dc, ch 2, sc) for even rows or (ch 2, sc, ch 2) for odd rows
Shell and Filled are the same
Monday, May 21, 2012
Star Lattice Stitch
So today I'm going to talk to you about a stitch pattern I have used several times. It's really rather simple, but I like the overall effect. The pattern consists of three rows repeated: a row of star stitches followed by two rows of double crochet stitches. The row of star stitches is denser and slightly thicker than the rows of dc. I think of the two rows of dc as the lattice, hence the star lattice stitch pattern.

My friend Nettie taught me the star stitch and has a picture tutorial about it here. Here's a brief explanation of the star stitch, but you should really check out Nettie's tutorial for help.
Decrease: YO, insert hook in same st as last stitch, YO, pull up a loop, YO, draw through 2 loops on hook, skip next stitch, YO, pull up a loop, YO, draw through 2 loops on hook, YO, draw through all 3 loops on hook.
Anyway, to do the star stitch, you chain 3 (counts as first dc), turn, then work a decrease stitch. Work a dc in the same stitch as the last leg of the previous decrease stitch. Then work decrease in the same stitch as the previous dc. Repeat (dc, decrease) across. At end of row, dc in last stitch.
Half of the stitches will have three stitches in them, and the other half will have none. In a normal decrease stitch pattern, you would decrease, ch 1, decrease, ch 1 across. The star stitch simply has a dc in place of the ch 1 space.
 I once made a scarf entirely out of the star stitch, but became a little frustrated with the number of times I had to pull out rows to fix a mistake. The scarf turned out beautifully, but my feeling of frustration remained. Having two rows of dc between each row of star stitches makes it more forgiving. It is much easier to 'fudge' something at the end of the row this way.
This stitch pattern lends itself to two striping patterns because it has three rows in it. Thick and Thin and Featured Color stripes work well.
To make something with this pattern:
Chain an odd number
Row 1: dc in 4th chain from hook, dc across
Row 2: ch 3, turn, dc across
Row 3: ch 3, turn, star stitch across
Rows 4-5: ch 3, turn, dc across
Repeat rows 3-5 until work reaches desired length.
Friday, May 4, 2012
Foundation Stitch
My friend Nettie recently introduced me to what she calls the Abrupt Increase, AbInc, stitch. Apparently, this stitch has an official name: the foundation stitch. This is an advanced technique that can be used deliberately or to correct mistakes. It essentially creates a new chain under each stitch, allowing you to work more free form. Nettie explains the stitch, and shows a purse she made using the stitch along with the pattern.
Have you ever made your chain and worked the first row of your project only to discover that you miscounted your chain? Instead of pulling it all out and starting over you can simply do the foundation stitch to add another chain. This is particularly useful because counting the chain and working the first row are the most tedious and attention requiring parts of crocheting.
Another use for the foundation stitch is to abruptly increase the number of stitches per row. That is the what Nettie did in making the clutch. She used it to make the sides of the purse.
 My favorite use for the stitch is its application to Tunisian crochet. Before I learned this stitch, I would chain the length of the row, then I would chain the height of the row, and then finally I could begin. The problem with that is that my chain is rarely perfectly even and consistent with the space my actual stitch takes up. The old method is pictured. Notice the chain on the left side of the work. With the new method, you simply chain the height and work your stitch until you are content, the starter chain is unnecessary. Less planning is needed and the side with the starting chain is not too loose or too tight because there is no starting chain.
Wednesday, May 2, 2012
Stripes: Color Blocks
 Here is the last installment, at least for a while, on color patterns. This striping scheme has four rows of the main color then two rows of the contrast color repeated. This is a variation of the Featured Color striping pattern where the 'featured' color is the same as one of the two other colors. Basically, one of the alternating colors is replaced to fill in the block with the featured color.
If instead of matching the featured color with one of the other colors, you make the two other colors the same, you end up with the Thick and Thin striping pattern.
So here's how to do this:
Make your chain and the first two rows in the contrasting color. At the end of the second row, tie on the main color, do not cut the contrasting color. Finish the stitch by pulling both strands through the loops. Chain with both strands together.


 Here's the pattern for this dishcloth:
Chain 28
Row 1: dc in 4th chain from hook, dc across
Row 2-14: ch 3, turn, dc across
Border:
Round 1: sc around (3 sc in corner)
Round 2: sc around (3 sc in corner)
Rows 3-6, 9-12 are in the red color.
Rows 1-2, 7-8, 13-14 are in the yellow color.
I made this using Sugar and Cream Country Yellow and Wine with a J hook.
Tuesday, May 1, 2012
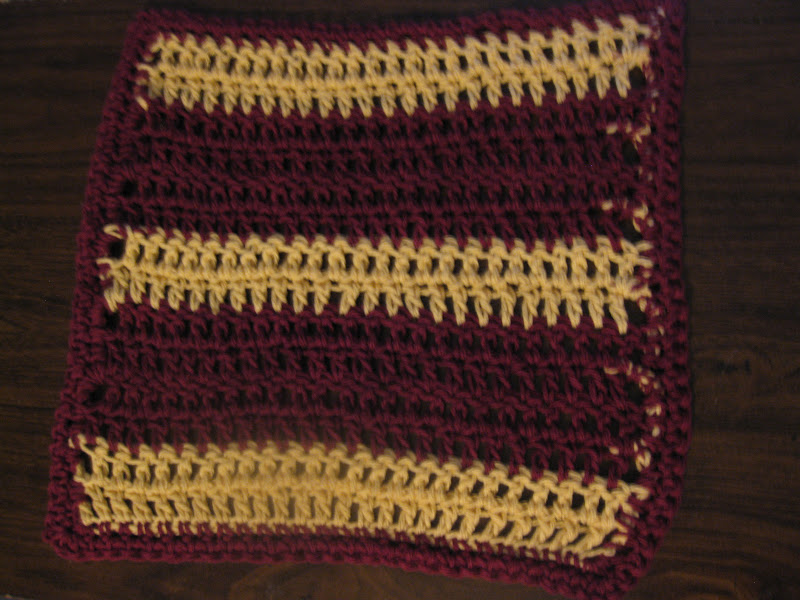
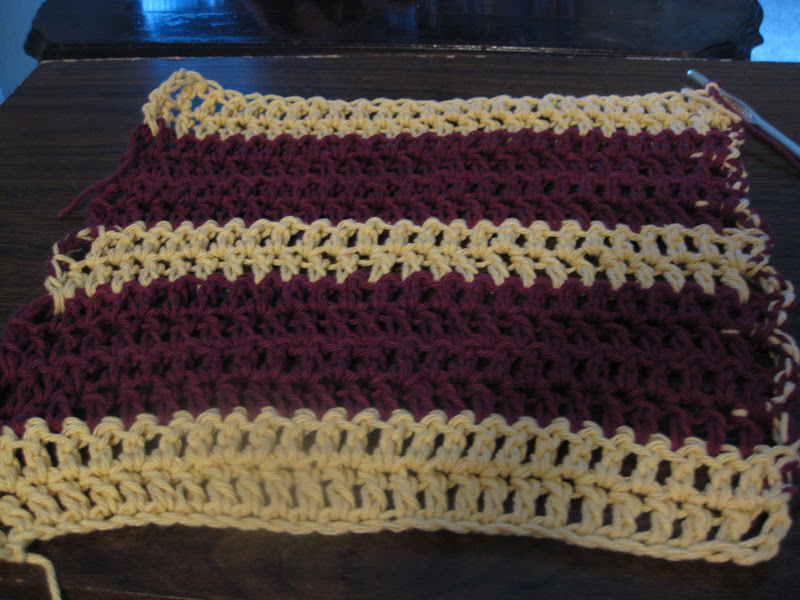
Stripes: Unequal stripes
 If, instead of using three colors, you only use two colors in the Flanking Colors stripe pattern, you get alternating widths of stripes of your main color. Four rows and two rows, with a single row of the contrast color in between. This pattern requires a lot of rows to see the overall result of it, and I think it would make a really pretty blanket. I probably will try something like this in the future, maybe in maroon and white.
So here's how to do this:
Work your chain and the first row in color B. At the end of the row, tie on color A, do not cut color B. Pull both through the loops to finish the stitch. Chain with both strands.


Release color B, and work row 2 with color A. At the end of the row, tie on another strand of color A. Finish the row by pulling both strands of color A through the loops. Chain with both strands.


Upon completion, the dishcloth has two thick stripes and one thin stripe of color A, and four stripes of color B. The color gets pulled up along both sides, but is not readily visible when it is two strands of the same color.
Here's the pattern:
 Chain 28
Row 1: dc in 4th chain from hook, dc across
Row 2-14: ch 3, turn, dc across
Border:
Round 1: sc around (3 sc in corner)
Round 2: sc around (3 sc in corner)
Rows 2-5, 7-8, 10-13 are in the red color.
Rows 1, 6, 9, 14 are in the yellow color.
I made this using Sugar and Cream Country Yellow and Wine yarn with a J hook.
Monday, April 30, 2012
Stripes: Flanking Colors
 After mapping out several patterns, and making several dishcloths, I came up with this three color pattern. A variation of the Half and Half striping pattern is to use two separate strands for one of the colors. This generates a look of two rows of the main color flanked on either side by a single row of a color, which varies between two colors.
 Here's how to do this:
Make your chain and work one row with color B. At the end of the row, tie on color C, do not cut color B. Finish the stitch by pulling both strands together through the loops. Chain with both strands.


Here's the pattern:
Chain 28
Row 1: dc in 4th chain from hook, dc across
Row 2-14: ch 3, turn, dc across
Border:
Round 1: sc around (3 sc in corner)
Round 2: sc around (3 sc in corner)
Rows 3-4, 7-8, 11-12 are in the red color.
Rows 1, 6, 9, 14 are in the green color.
Rows 2, 5, 10, 13 are in the yellow color.
I made this using Sugar and Cream Sage Green, Country Yellow, and Wine with a J hook.
Sunday, April 29, 2012
Stripes: Featured Color
 So, I decided to map out the color patterns that I've made to this point. I developed a way of drawing them out that let me try out new patterns. Here's what I came up with: 1 row Color A, 2 rows Color B, 1 row Color A, 2 rows Color C, repeated. The end result is thick stripes of color flanked by Color A, the 'featured' color. If you make colors B and C the same, you get the Thick and Thin stripe pattern.
Here's how to do this: make your chain, and work 2 rows in the same color (color B). At the end of the second row, tie on color A, do not cut color B. Pull both strands through the loops to complete the stitch. Chain with both strands.


 Here's the pattern:
Chain 28
Row 1: dc in 4th chain from hook, dc across
Row 2-14: ch 3, turn, dc across
Border:
Round 1: sc around (3 sc in corner)
Round 2: sc around (3 sc in corner)
Rows 3, 6, 9, 12 are in the red color.
Rows 1-2, 7-8, 13-14 are in the green color.
Rows 4-5, 10-11 are in the yellow color.
I made this using Sugar and Cream Sage Green, Country Yellow, and Wine with a J hook.
Subscribe to:
Posts (Atom)