Thursday, May 10, 2012

Bumpy Bath Mats

Crocheted bath mats are especially nice because they not only are washable, but they improve when washed.  Cotton shrinks when washed, so it tightens up and actually feels softer after the first washing.  The stitch used to make the Bumpy Dishcloths is great for bathmats because the bumpiness feels good on your feet. I like variegated yarn for bathmats because it makes interesting patterns and the border looks neat.

These make great gifts.  I've given a set of them to both of my brothers as Christmas gifts when they resided in dorms.  Guys, especially dorm dwellers, are difficult to shop for, let alone make something for, but these work well in dorms.  With two, you can put one in front of the sink and one in front of the tub. 

Here's the pattern:
Ch 54
Row 1: sc in 2nd ch from hook, sc across, ch 1, turn
Row 2: sc, (tc, sc) x 13, ch 1, turn
Row 3: sc across, ch 1, turn
Row 4: sc, sc, (tc, sc) x 12, sc, ch 1 turn
Row 5: sc across, ch 1, turn
Repeat Rows 2-5 eight times, so that there are 18 rows of bumps. 

Border:
Round 1: sc around with 3 sc in each corner
Round 2: sc around with 3 sc in each corner
Slip stitch and fasten off.

This is the pattern for the bath mat I made for myself.  I made a larger size for my brothers by simply repeating the pattern more times.  Another modification that I have done is to make it with two strands at once.  It makes it thicker, so you don't need as long of a chain initially or do as many repeats.   Essentially, repeat the pattern until you are happy with the size. 

I made this using Sugar and Cream cotton yarn in Crown Jewel Ombre with a J hook.

Tuesday, May 8, 2012

Stitch 28 Revisited

Now that I'm done trying out the stitches from the Triple Play Pattern Stitches Book, I get to use them (or not) as I see fit.  So, I decided to make another baby blanket using stitch 28.  When I was making baby blankets from these stitches previously, the purpose was to showcase the stitch.  As such, it didn't make sense to use a dramatically variegated yarn, so I've been left with a lot of variegated baby yarn in my stash.  I made this blanket in an attempt to crochet down my stash.

I made it exactly the same as the stitch 28 baby blanket I made previously.  Here's the pattern:


Chain 91, then work the stitch until work is square.  Add the standard border and you're done.
Round 1: sc around, 3 sc in each corner
Round 2: dc around, 5 dc in each corner
Round 3: sc around, 3 sc in each corner
Round 4: (sc, ch 3, sk 1) around, (sc, ch 3, sc in same stitch) at corner

I made this using Baby Bee Sweet Delight Lullaby with a J hook.

Monday, May 7, 2012

Coupons!

Check out my 'Current Coupons' page.  On it you will find a page containing coupons for the week.  I plan to update them weekly, so they should stay current.  This way, you don't have to track down the coupons for yourself.  See my Coupon Guide for tips on using them as well as ways to obtain them yourself.

Friday, May 4, 2012

Foundation Stitch

My friend Nettie recently introduced me to what she calls the Abrupt Increase, AbInc, stitch.  Apparently, this stitch has an official name: the foundation stitch.  This is an advanced technique that can be used deliberately or to correct mistakes.  It essentially creates a new chain under each stitch, allowing you to work more free form.  Nettie explains the stitch, and shows a purse she made using the stitch along with the pattern. 

Have you ever made your chain and worked the first row of your project only to discover that you miscounted your chain?  Instead of pulling it all out and starting over you can simply do the foundation stitch to add another chain.  This is particularly useful because counting the chain and working the first row are the most tedious and attention requiring parts of crocheting. 

Another use for the foundation stitch is to abruptly increase the number of stitches per row.  That is the what Nettie did in making the clutch.  She used it to make the sides of the purse.

My favorite use for the stitch is its application to Tunisian crochet.  Before I learned this stitch, I would chain the length of the row, then I would chain the height of the row, and then finally I could begin.  The problem with that is that my chain is rarely perfectly even and consistent with the space my actual stitch takes up.  The old method is pictured.  Notice the chain on the left side of the work.  With the new method, you simply chain the height and work your stitch until you are content, the starter chain is unnecessary.  Less planning is needed and the side with the starting chain is not too loose or too tight because there is no starting chain.

Thursday, May 3, 2012

Thin Mint Blanket

I don't know about you, but I don't like shopping for gifts off of registries.  The concept is good, getting people what they want and not duplicating it, but in application it never works out quite like that.  People forget to use the registry and you end up with four crock pots.  Also, the gifts don't really show much thought or originality, not to mention that the stuff tends to be overpriced.  So, for baby showers I like to give baby blankets and for weddings full sized blankets.  When it is handmade, it will not be duplicated!


So, if there is a wedding of a close friend coming up, start crocheting, and you'll have a unique gift they will hopefully keep forever that will be memorable.  When I decide to make someone a blanket for their wedding, I first inquire as to their wedding colors.  If they picked them for the wedding they obviously like the colors.  Then I get creative and come up with something using those colors.  If you don't know where to start, look through some pattern books and see what you like: try to visualize the pattern in the color scheme.  Then get crocheting!

My buddy is getting married soon, so I made a blanket for them.  When I bothered him about the colors for the wedding he told me to 'think Thin Mints' as a description of the green and brown colors they had chosen.  So, I've thought of this blanket as my 'Thin Mint Blanket' even before I began it.

This blanket is an application of the Half and Half striping pattern.  The diamond portion of the blanket changes colors every two rows, so this color pattern applies so yarn cutting is not required.  I do however cut the brown yarn when each set of diamonds is complete.  It would be a little ridiculous to carry the brown color up through 13 rows of green.

Here's how to make it:
Chain 164
Row 1: sc in 2nd chain from hook, (ch 3, sk 2, dc, ch 3, sk 2, sc) across (green)
Row 2: ch 4, turn, dc in sc (sc in dc, [dc, ch 1, dc, ch1, dc] in sc) across, (dc, ch 1, dc) in last sc (brown)
Row 3: ch 6, turn, sc in sc (ch 3, dc in middle dc, ch 3, sc in sc) across, ch 3, dc in last dc (brown)
Row 4: ch 1, turn, (sc in dc, [dc, ch 1, dc, ch1, dc] in sc) across, sc in last dc (green)
Row 5: ch 1, turn, sc in sc (ch 3, dc in middle dc, ch 3, sc in sc) across (green)
Rows 6-13: repeat rows 2-5 twice
Row 14: repeat row 2
Row 15: repeat row 3
Row 16:  ch 1, turn, (sc in dc, [dc, ch 1, hdc, ch1, dc] in sc) across, sc in last dc (green)
Row 17: ch 3, turn, dc in every ch 1 space, hdc, dc, and sc across  (green)
Rows 18-27: ch 3, turn, dc across (green)
Row 28: ch 1, turn, sc, (ch 3, sk 2, dc, ch 3, sk 2, sc) across

Repeat Rows 2-28 5 times, ending with Row 16 (There will be six sets of diamonds)

Border: (brown)
Round 1: sc around, 3 sc in corner
Round 2: dc around, 5 dc in corner
Round 3: sc around, 3 sc in corner
Round 4: (dc, ch 1, sk 1) around, (dc, ch 1, dc, ch 1, dc) in corner
Round 5: sc around, 3 sc in corner
Round 6: dc around, 5 dc in corner
Round 7: sc around, 3 sc in corner

The final dimensions were 75" x 110", weighs 4.4 lbs, and took about 10 skeins to complete.

I made this using I Love this Yarn, Mid Green and Coffee with a J hook.

Wednesday, May 2, 2012

Stripes: Color Blocks

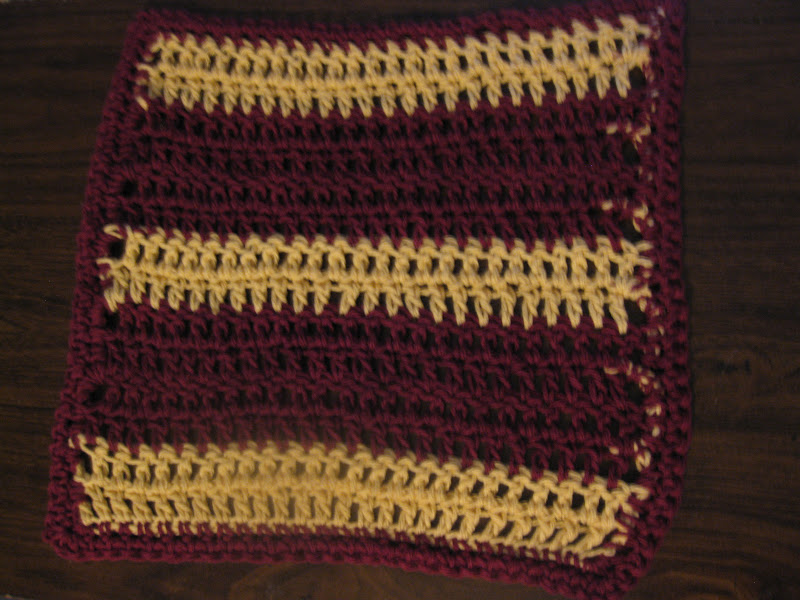
Here is the last installment, at least for a while, on color patterns.  This striping scheme has four rows of the main color then two rows of the contrast color repeated.  This is a variation of the Featured Color striping pattern where the 'featured' color is the same as one of the two other colors.  Basically, one of the alternating colors is replaced to fill in the block with the featured color.

If instead of matching the featured color with one of the other colors, you make the two other colors the same, you end up with the Thick and Thin striping pattern.

So here's how to do this:
Make your chain and the first two rows in the contrasting color.  At the end of the second row, tie on the main color, do not cut the contrasting color.  Finish the stitch by pulling both strands through the loops.  Chain with both strands together.

Work one row with the main color.  At the end of the row, tie on another strand of the main color.  Pull both strands through the loops to complete the stitch.  Chain with both strands.
Work two rows with the new strand of the main color.  Switch back to the original strand of main color for the fourth row of the main color.  In this color pattern, the contrasting color is always pulled up on the same side.

 Here's the pattern for this dishcloth:
Chain 28
Row 1: dc in 4th chain from hook, dc across
Row 2-14: ch 3, turn, dc across
Border:
Round 1: sc around (3 sc in corner)
Round 2: sc around (3 sc in corner)

Rows 3-6, 9-12 are in the red color.
Rows 1-2, 7-8, 13-14 are in the yellow color.

I made this using Sugar and Cream Country Yellow and Wine with a J hook.


Tuesday, May 1, 2012

Stripes: Unequal stripes

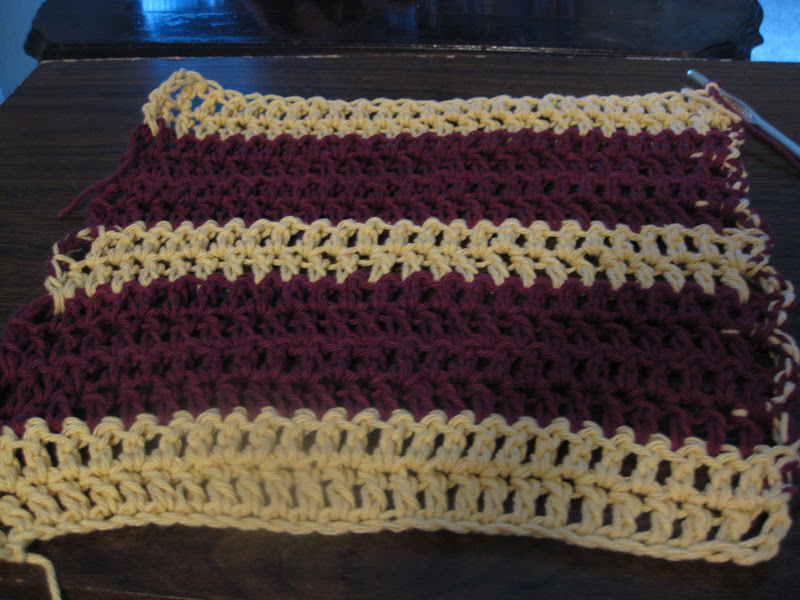
If, instead of using three colors, you only use two colors in the Flanking Colors stripe pattern, you get alternating widths of stripes of your main color.  Four rows and two rows, with a single row of the contrast color in between.  This pattern requires a lot of rows to see the overall result of it, and I think it would make a really pretty blanket.  I probably will try something like this in the future, maybe in maroon and white.

So here's how to do this:
Work your chain and the first row in color B.  At the end of the row, tie on color A, do not cut color B.  Pull both through the loops to finish the stitch.  Chain with both strands.


Release color B, and work row 2 with color A.  At the end of the row, tie on another strand of color A.  Finish the row by pulling both strands of color A through the loops.  Chain with both strands.


Release the first strand of color A, and work two rows with the new strand of color A, pulling color B up along the side.
For the fifth row, switch back to the first strand of color A.

Upon completion, the dishcloth has two thick stripes and one thin stripe of color A, and four stripes of color B.  The color gets pulled up along both sides, but is not readily visible when it is two strands of the same color.

Here's the pattern:
Chain 28
Row 1: dc in 4th chain from hook, dc across
Row 2-14: ch 3, turn, dc across
Border:
Round 1: sc around (3 sc in corner)
Round 2: sc around (3 sc in corner)

Rows 2-5, 7-8, 10-13 are in the red color.
Rows 1, 6, 9, 14 are in the yellow color.


I made this using Sugar and Cream Country Yellow and Wine yarn with a J hook.