Wednesday, June 27, 2012

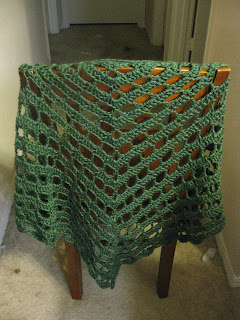
Spaced Shell Shrug

So I've already shown you the pink and yellow shrug I made using Nettie's pattern.  Last time I was surprised by the size of the shrug, but this time I was prepared and used my larger gauge to my advantage and intentionally made this one adult sized.  For this one, I modified the pattern by using a completely different stitch for the body of the shrug: the Spaced Shell stitch.

Some modifications work better than others, and this would go into the 'others' category.  The shrug is the right size and fits, but it has no give in it.  Shell stitches generally do not stretch, so for the main part of a garment, shells are not appropriate.  I wish I had remembered that fact before beginning this shrug.  I can put it on fairly easily, but taking it off is much more difficult.  Each time I worry that I will either tear it or get stuck in it.  Neither has happened, but it is not comfortable. 

The next shrug I make I will use a more giving stitch, like the star stitch, or the star lattice stitch.  And I will make another, they are too useful and too quick not to make them.  Again, I learned a lot by experimenting with this. 

I made this using Simply Soft Dark Pine and a J hook.

Monday, June 25, 2012

Spaced Shell Stitch

There are many variations of the shell stitch, here is one of them: essentially, you work a row of the simple shell stitch, and then you do a row of scaffolding to even out the height of the stitches.  Then you do a row of the simple shell stitch again, but this time shifted over half a repeat.  Hopefully that made some sense.  Put another way, you work the simple shell stitch, but with scaffolding in between, spacing the shells.

One thing I learned from the Triple Play Pattern Stitches book, is that seeing a stitch in different color patterns makes it much easier to follow a pattern.  Therefore, I made swatches of this stitch in different color patterns for your perusal.  The top picture shows a solid color version; the middle picture shows a two color version with rows 2 and 3 maroon and rows 4 and 5 white; the bottom picture shows a three color version changing colors every row, beginning with white, then brown, then yellow.

Ch multiple of 6 +5
Row 1: sc in 2nd ch from hook, sk 2, (5 dc in next ch, sk 2, sc, sk 2) across, 3 dc in last ch
Row 2: ch 1, turn, sc in dc, ch 2, sk 2, (dc in sc, ch 2, sk 2, sc in dc, ch 2, sk 2) across, dc in last sc
Row 3: ch 3, turn, 2 dc in dc, (sc in sc, 5 dc in dc) across, sc in last sc
Row 4: ch 5, turn, sk 2,(sc in dc, ch 2, sk 2, dc in sc, ch 2, sk 2) across, sc in last dc
Row 5: ch 1, turn, sc in sc, (5 dc in dc, sc in sc) across, 3 dc in last dc

Repeat Rows 2-5 for pattern, ending with Row 2 or Row 4

Friday, June 22, 2012

Ravelry!

So, for all of you out there who are not yet on ravelry, you should join!  It's a great resource for yarn crafters because it was specifically designed for knitters and crocheters.  Oh, and it's free!  There are so many things you can do on it, but here's what I've used it for.

The notebook is awesome; it includes a message box for communicating with other ravelers, a library for keeping track of what pattern books you own as well as digital patterns, a 'stash' for keeping track of the types, colors, and quantities of yarn you own, a project list for ongoing and completed projects, and a queue for lining up future projects (or just saving the patterns for future reference).  There are several other aspects to this tab, but that's what I primarily use it for.  You can, for instance have friends on ravelry and you can navigate to their notebooks through this. 

Ravelry does more than just keep track of what you've done and how you've done it (which is incredibly valuable).  There is a patterns tab where you can search for patterns and narrow your search based on type of craft (knit or crochet), difficulty, price (free or otherwise), category (hat, afghan, dishcloth, etc), popularity, or newness of the pattern.  I've found some great patterns to try on ravelry, and all of my patterns are listed there.  They also have groups and forums tabs where you can find local yarn crafters and get help with patterns as needed.

Ravelry was especially valuable to me on the Celtic Star Blanket because the gray color of yarn I was using was discontinued and I needed one more skein to finish it.  I went on ravelry and searched for that yarn in other people's stashes (actually pretty easy to do), and sent them a message offering to buy it from them.  This worked, and I now have a complete afghan.  This wouldn't have happened if I didn't have ravelry.  

More features are available but those are the ones that I have found particularly useful.  Ravelry can be a fun way to spend some time and get some inspiration.   It's also a great way to keep track of things you've made, how you made them, and to keep track of your inventory.

If you want to look me up I'm hazel92 on there.  You can check out my projects.  I don't blog about all of them, so it won't all be redundant. 

Tuesday, June 19, 2012

On a more serious note: Be Ready


Let me just preface this by saying: I am all right, I was not hurt. 
Driving to the lab today, it was a fairly normal morning, though I did get out the door a bit later than I had planned.  I had just gotten on the interstate and was messing with the radio.  I heard a horrible screeching sound, thought, ‘Oh no, what’s wrong with my car.’  I looked down at my gauges and it all looked normal.  I then saw a white sedan driving perpendicular to the interstate, cutting across several lanes of traffic, from the left lane to go off the shoulder, flip, then flip again to rest right side up.  This car nearly hit me.  A couple of seconds was the difference between me being T-boned and me being completely fine.  I nearly died today.  So, maintain your vehicles, drive safely, be alert, and be ready because you never know when your time is up.

Monday, June 18, 2012

The Return of Stitch Thirteen!

Since my favorite stitches from the book are One and Thirteen, I decided that I needed to use them again.  I made a purple and yellow checkered baby blanket from stitch one, and now I've made two more out of stitch thirteen.  I made the two of them exactly the same but with different yarn.  I am still endeavoring to clean out my stash, so I made one out of the sparkly pink yarn I used for the stitch Seventeen baby blanket.  I've previously stated that I thought the elegance of stitch thirteen would be disguised by stripes or variegated yarn.  I decided to test that out using the rainbow yarn I've used several times.  This yarn is so pretty that it will look great with any stitch. 


I've concluded that the stitch works fine with any color pattern.  It works better with some but it is such a gorgeous stitch that it will accommodate whatever you want to do.  It's interesting enough in and of itself to be done in a single color, and it can handle whatever else you throw at it.  This is definitely a stitch to have in your arsenal. 

Here's the pattern:
Chain 92, then work the stitch until work is square.   Add the standard border:
Round 1: sc around, 3 sc in each corner
Round 2: dc around, 5 dc in each corner
Round 3: sc around, 3 sc in each corner
Round 4: (sc, ch 3, sk 1) around, (sc, ch 3, sc) in each corner

I made these using Baby Bee Sweet Delight Pomp Iris Dream yarn or Bernat Baby Coordinates Candy Baby yarn with a J hook. 

Friday, June 15, 2012

Simple Shrug by Nettie

So, my friend Nettie has designed a shrug, ostensibly for toddlers and girls, that is easily adaptable for adults.  It is elegantly simple, and thus easy to modify.  It has a really clever design that makes it easy to work with.  I tried out her pattern, using the 6T size, and it ended up being big enough for me to wear.  The moral of the story is: pay attention to gauge! 

In any case, I now possess a bright pink and yellow shrug that I will likely never wear, but I learned a lot from the construction.  Had I made it the correct size, it would be perfect for a little girl.  I modified the pattern a little bit even on this first one because I was running out of yarn.  I made the bottom the same as the top when I added the collar.  I ended up using every inch of the pink yarn that I own, just finishing it with adjustment, so no scraps left! 

Today, I started making one, intentionally for myself this time, out of a dark green color that I will actually wear.  It's based on her pattern, but uses different stitches.  This pattern is great because it is so adaptable.  Anyway, she's selling this pattern at her etsy store, and I think it's worth the money because it makes shrug making simple instead of a nightmare.  She calls it a 'Girl's Summer Shrug' and has pictures of her daughter B actually wearing it. 

Wednesday, June 13, 2012

Half Lace Shawl

So, I've designed yet another shawl and this one is my favorite so far.  I've thought of this as a half and half shawl: half lace, half solid.  It is just like the Lacy Shawl except that half of the rows are filled in with dc.  It is not as warm as the Cozy Shawl, nor is it as open as the Lacy Shawl.  It is comfortably in between. 

Here's the pattern:
Chain 2
Row 1: 3 sc in 2nd chain from the hook (3 sc)
Row 2: ch 1, turn, 2 sc in first sc, sc, 2 sc in last sc (5 sc)

Edging:
Row 1: ch 1, do not turn, 2 sc in corner, sc, 3 sc in point, sc, 2 sc in corner (9 sc)
Row 2: ch 3, turn, 2 dc in corner, ch 3, sk 3, (dc, ch 3, dc) in point, ch 3, sk 3, 3 dc in corner
Row 3: ch 3, turn, 2 dc in corner, (dc in dc, 3 dc in ch 3 space) to point, 7 dc in point, (dc in dc, 3 dc in ch 3 space) to corner, 3 dc in corner
Row 4: ch 3 turn, 2 dc in corner, (ch 3, sk 3, dc) to point (dc, ch 3, dc) in point, (ch 3, sk 3, dc) to corner, 3 dc in corner

Rows 5-26: repeat rows 3 and 4 (11 times)

Row 27: ch 3, turn, 2 dc in corner, dc, 4 dc in next dc, sc in dc, (7 dc in dc, sc in dc) to point, 7 dc in point,  sc in dc, (7 dc in dc, sc in dc) to last 3 dc, 4 dc in next dc, dc, 3 dc in corner

Finishing: ch 1, turn, sc across the top, slip stitch, fasten off, weave in ends.

I made this using Simply Soft Dark Pine and a J hook.

Monday, June 11, 2012

Modified Lacy Shawl

So, I have come up with another version of the Lacy Shawl pattern.  The only thing that changes is how you do the points.  Instead of doing (ch 3, dc, ch 3) in the points of even rows, now you do 7 dc.  The effect is that shells go down the center of the shawl.  I think this is actually easier than the original pattern because there is a defined place to do every stitch: you never have to do a stitch into a ch 3 space. 

Here's the full pattern with the modification: 
Chain 2
Row 1: 3 sc in 2nd chain from the hook (3 sc)
Row 2: ch 1, turn, 2 sc in first sc, sc 2 sc in last sc (5 sc)


Edging:
Row 1: ch 1, do not turn, 2 sc in corner, sc, 3 sc in point, sc, 2 sc in corner
Row 2: ch 3, turn, 2 dc in corner, ch 3, sk 3, 7 dc in point, ch 3, sk 3, 3 dc in corner
Row 3: ch 3, turn, 2 dc in corner, dc in next 2 dc, ch 3, dc in dc, (dc, ch 3, dc) in point, dc in dc, ch 3, dc in next 2 dc, 3 dc in corner
Row 4: ch 3, turn, 2 dc in corner, ch 3, sk 3, dc, ch 3, dc in dc, ch 3, 7 dc in point, ch 3, dc in dc, ch 3, dc, ch 3, sk 3, 3 dc in corner
Row 5: ch 3, turn, 2 dc in corner, dc in next 2 dc, ch 3, (dc in dc, ch 3) to point, (dc, ch 3, dc) in point, ch 3, (dc in dc, ch 3) to last 3 dc, dc in next 2 dc, 3 dc in corner
Row 6: ch 3, turn, 2 dc in corner, sk 3, (ch 3, dc in dc) to point, 7 dc in point, dc in dc, (ch 3, dc in dc) to corner, 3 dc in corner

Rows 7-26: repeat rows 5-6 10 times

Row 27: ch 3, turn, 2 dc in corner, dc, 4 dc in next dc, sc in dc, (7 dc in dc, sc in dc) to point, 7 dc in point,  sc in dc, (7 dc in dc, sc in dc) to last 3 dc, 4 dc in next dc, dc, 3 dc in corner

Finishing: ch 1, turn, sc across the top, slip stitch, fasten off, weave in ends.


Essentially, you dc in each of the posts across with either a (dc, ch 3, dc) or a (ch 3, dc, ch 3) in the point.  You will always have 3 dc in the corners (ch 3 counts as a dc).

I made this with Simply Soft Ocean yarn and a J hook.

Wednesday, June 6, 2012

More Baby Blankets!


So, since I just keep churning out baby blankets, mostly from the book I reviewed, I'm going to just combine a couple so that this doesn't get monotonous.  This time I used stitches one and two to make baby blankets.  I figured that it was time I use stitch 1 again, seeing as how I have proclaimed it one of my two favorites in the book.  Stitch 2 is just great because it is so simple and works so well with variegated yarn.


Just so you know, you can get a preview of the book by clicking 'look inside' on the amazon page, here.  It will show you the first three stitch patterns.

Anyway, here are the patterns.
For the stitch one baby blanket:
Chain 94, then work the stitch until square.
The color pattern I used is 1 row of yellow, 2 rows of purple, then (2 rows of yellow, 2 rows of purple) repeated, ending with a single row of yellow.  Add the standard border in purple:
Round 1: sc around, 3 sc in each corner
Round 2: dc around, 5 dc in each corner
Round 3: sc around, 3 sc in each corner

Round 4: (sc, ch 3, sk 1) around, (sc, ch 3, sc in same stitch) at corner

I made this using Lion Brand Pound of Love baby yarn in Pastel Yellow and Lavender with a J hook.

For the stitch two baby blanket:
Ch 90, then work the stitch until square.  Add the border, and you're done:
Round 1: sc around, 3 sc in corner
Round 2: dc around, 5 dc in corner
Round 3: sc around, 3 sc in corner
Round 4: (sc, ch 3, sk 1) around, (sc, ch 3, sc) in corner

I made this using Baby Bee Sweet Delights 'Sugar Plum Camo' yarn with a J hook.

Friday, June 1, 2012

Shell Grid Baby Blanket

So, a while ago, I started to make a shell baby blanket, and got bored with it early on.  So I decided to experiment a little with having a little bit of a built in border.  I worked shell stitches on the top and bottom and edges of the blanket, then simply made a grid for the interior.  At the edges I did 3 dc and a sc.  If it was sc, 3 dc, then the height of the grid for that row was a dc; in the other case, where it was 3 dc, sc, then the height fo the grid for that row was a sc.  The gird therefore alternates in height, producing, I think, a more interesting effect than a plane grid.  In any case, I had made the body entirely out of white, and I wanted it to be an Aggie blanket, so I did a wider than normal border (7 rounds instead of 4) in maroon to balance out the white. 

I am quite pleased with the result of my little experiment.  However, I would caution anyone considering doing a built in border that they are much more complicated than a traditional border.  Much more thought and planning must occur.  One of the reasons I prefer crocheting to knitting is that crocheting is more free form and requires much less planning.  This undoes that a little bit.  If you only do a built in border, the final width of your project is set when  you make your chain, and you have to start and finish with the appropriate rows.  The most difficult part of this project was figuring out how to do the last couple of rows. 

Stitch Definitions:
Half of a double crochet: YO, pull up a loop, pull through 2 loops on hook

Reverse Shell: pull up a loop through dc, work half a dc around the ch 3, work half of a dc in sc, work half of a dc around ch 3, pull up a loop through dc, pull through all 6 loops on hook

Here's the pattern:
Body: (white)
Chain 98
Row 1: sc in 2nd chain from hook, (sk 2, 5 dc in next ch, sk 2, sc) across
Row 2: ch 3, turn, 2 dc in sc, sk 2, sc in dc, (ch 2, sk 2, dc in sc, ch 2, sk 2, sc in dc) across, sk 2, 3 dc in last sc
Row 3: ch 1, turn, sc in first dc, sk 2, 3 dc in sc, (ch 2, dc in dc, ch 2, dc in sc) across, 3 dc in last sc, sk 2, sc in last dc
Row 4: ch 3, turn, 2 dc in sc, sk 2, sc in dc, (ch 2, sc in dc) across, sk 2, 3 dc in last sc
Row 5: ch 1, turn, sc in first dc, sk 2, 3 dc in sc, (ch 2, dc in sc) across, 3 dc in last sc, sk 2, sc in last dc

Repeat Rows 4 and 5 until work is square

2nd to last row: ch 3, turn, 2 dc in sc, sk 2, sc in dc, (ch 3, sc in dc, ch 3, dc in dc) across, sk 2, 3 dc in last sc
Last Row: ch 1, turn, sc in first dc, (ch 2, Reverse Shell, ch 2, sc) across

Border: (maroon)
Round 1: sc around, 3 sc in corner
Round 2: dc around, 5 dc in corner
Round 3: sc around, 3 sc in corner
Round 4: (dc, ch 1, sk 1) around, (dc, ch 1, dc, ch 1, dc) in corner
Round 5: sc around, 3 sc in corner
Round 6: dc around, 5 dc in corner
Round 7: sc around, 3 sc in corner


I made this using Bernat Satin Bordeaux and Snow and a J hook.